Vendors
The Vendor Dashboard provided by slickmall offers an extensive range of features that grant vendors complete control over various settings. This comprehensive dashboard empowers vendors to effortlessly configure, customize, and update product details according to their preferences. Let’s now explore a step-by-step guide on how to effectively operate the your dashboard.
To begin, log in to your slickmall vendor account using your unique credentials. Once logged in, navigate to the vendor dashboard section.
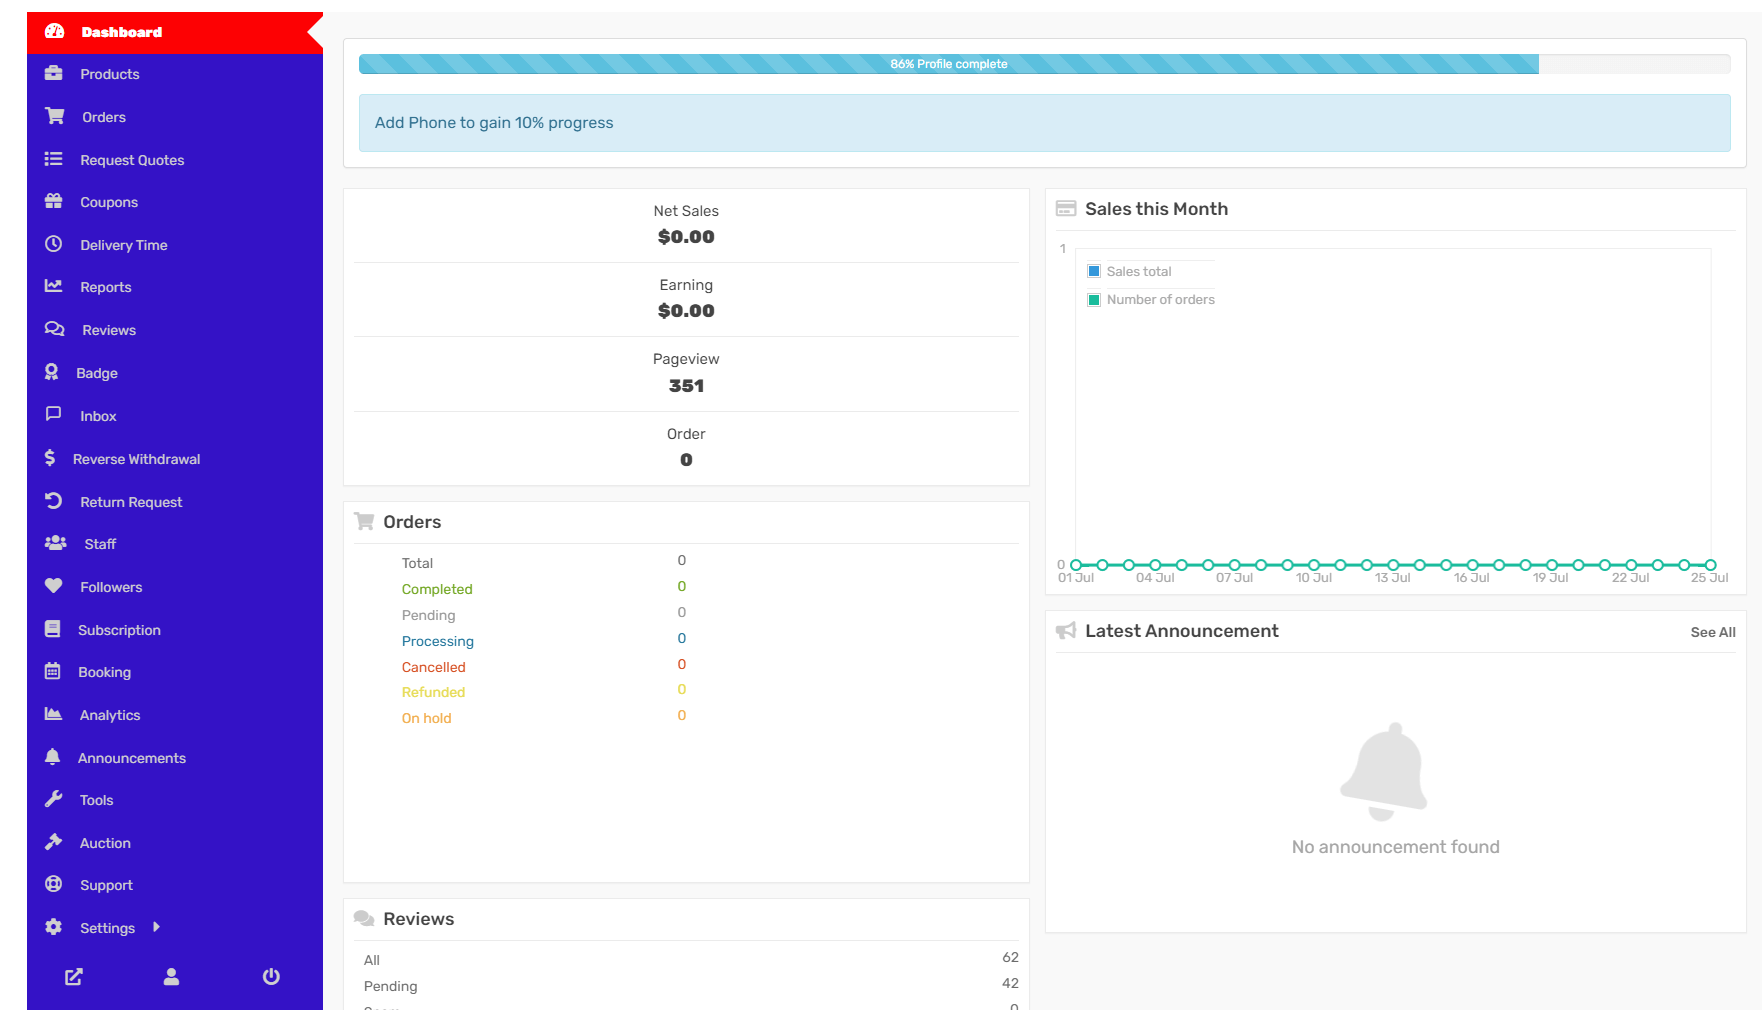
Upon entering the vendor dashboard, you’ll be greeted with a user-friendly interface displaying an overview of your store’s performance, sales analytics, and other essential metrics. This snapshot will help you stay informed about your store’s progress. Please see below:
Products
Slickmall makes the process of creating products as a vendor incredibly simple and user-friendly. Once you register on your marketplace, you can effortlessly add and customize products through an intuitive dashboard.
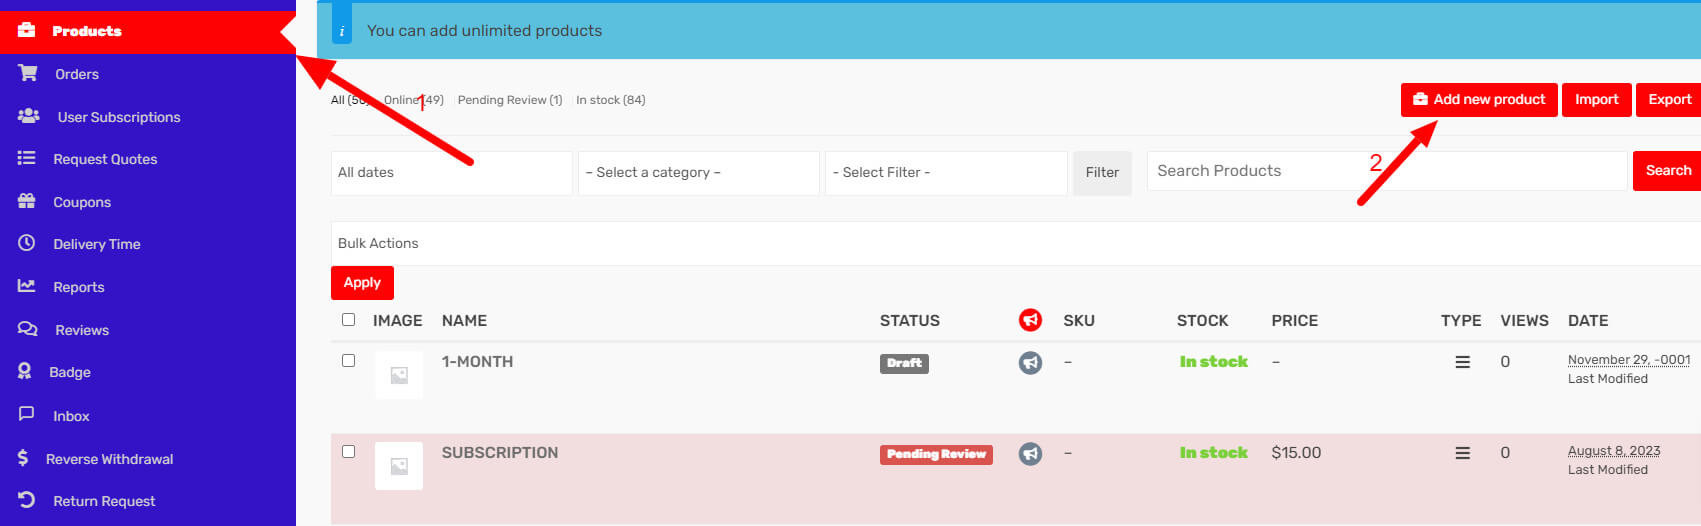
To begin creating a product, you should access the vendor dashboard. From there, you can easily locate the “Products” option in the left menu and click on it. Upon clicking, a “Add New Products” button will be visible in the top right corner of the screen.
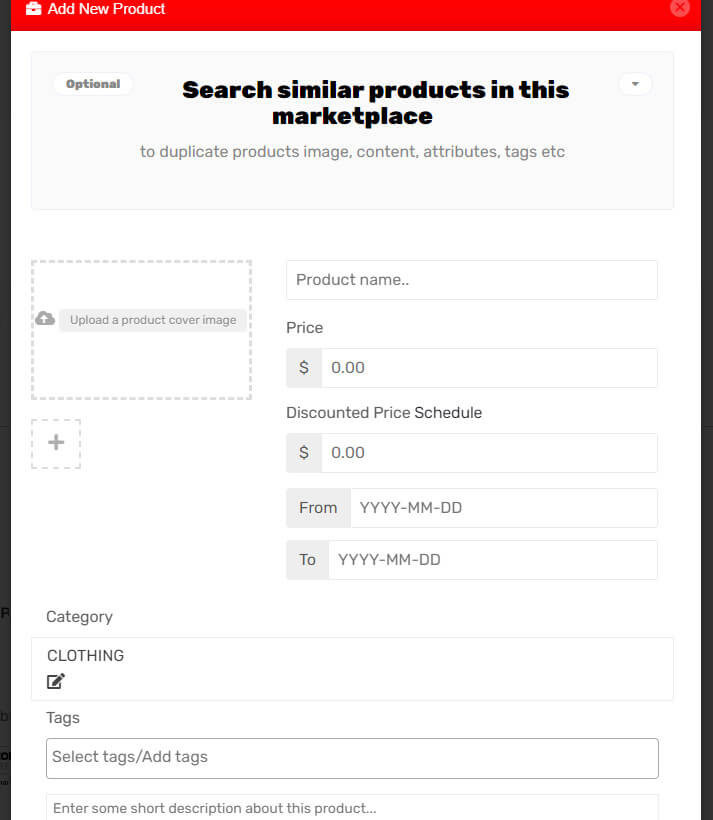
Upon clicking the “Add New Products” button, a new window will open, providing a straightforward interface for the you to input all the necessary primary details such as name, price and images.
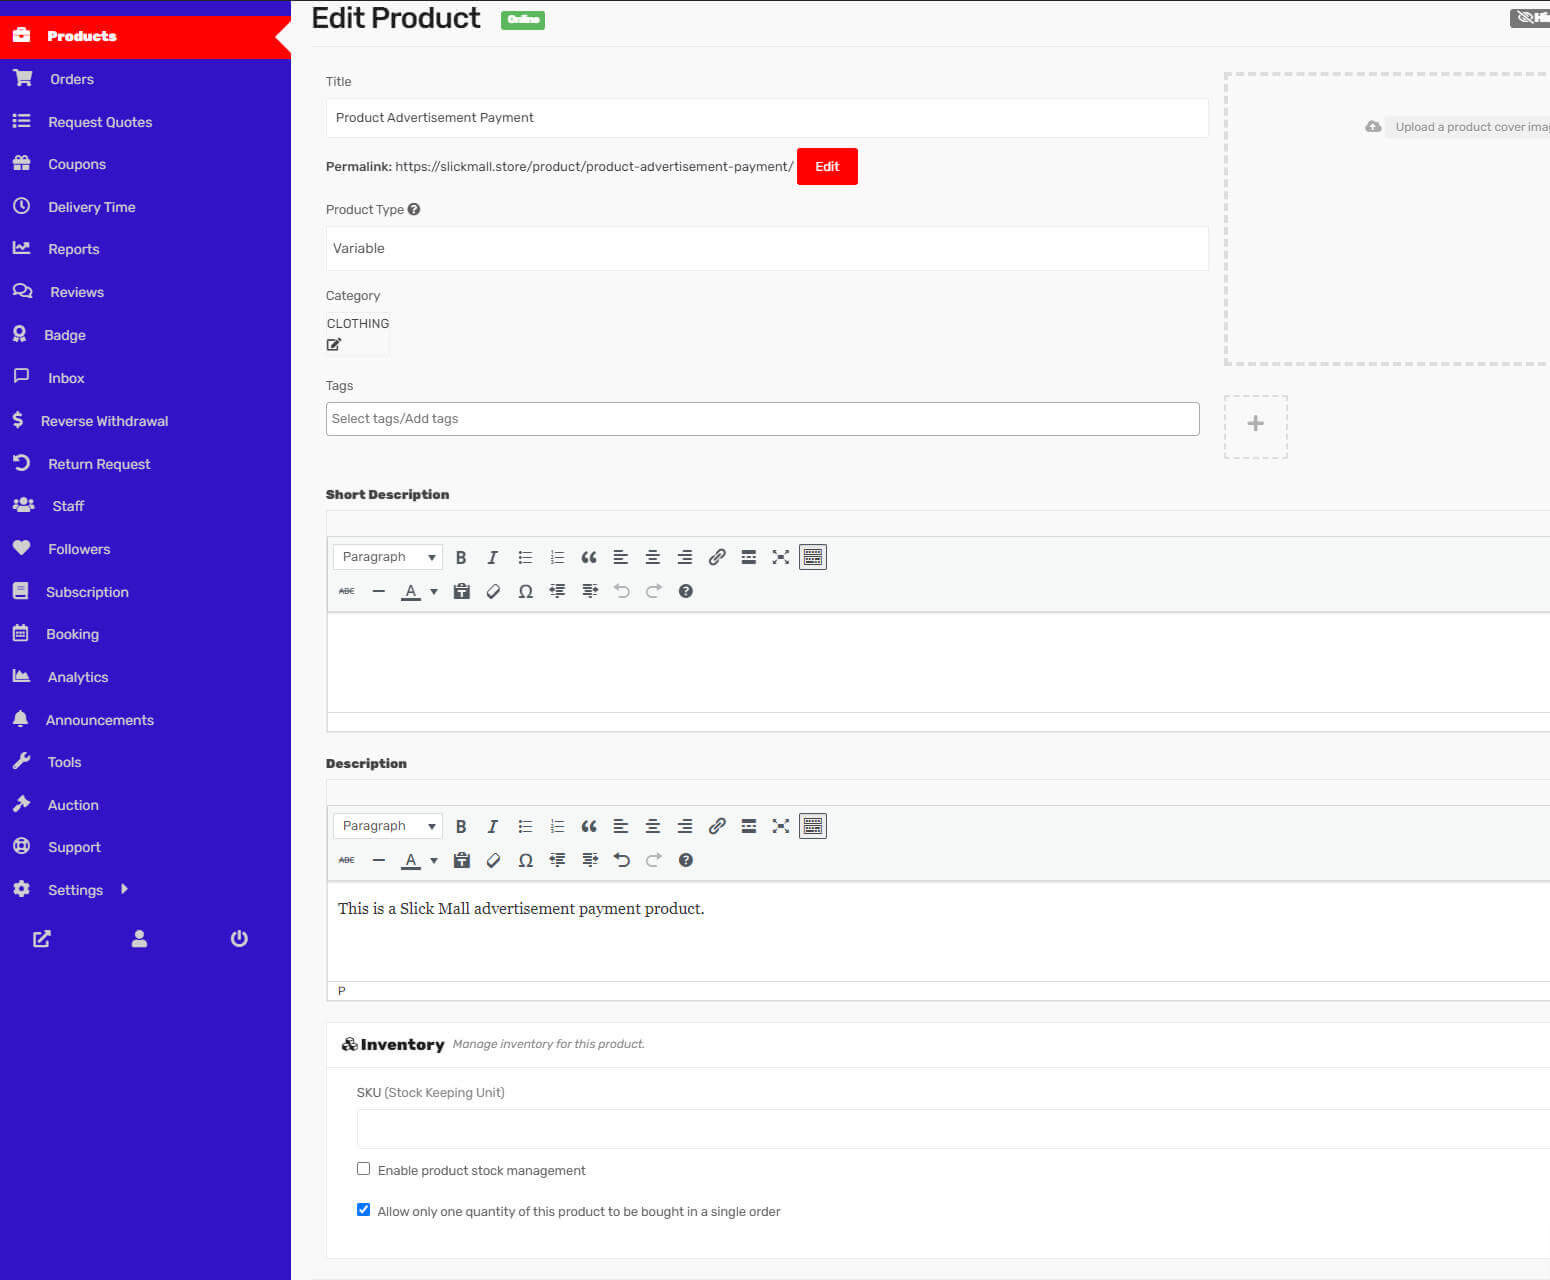
After saving the product, click on “edit” and you can proceed to fill in the essential information about the product, such as its description, meta, and any other relevant details. The intuitive design of Slick Mall’s dashboard ensures that the entire process is hassle-free and requires minimal effort from you as a vendor.
To ensure consistency and minimize excessive load time, all vendors are kindly requested to follow the recommended image requirements for their products:
1. Image size: 720×660 pixels
2. Aspect Ratio: 12:11
3. File Size: 120kb
4. Maximum 5 images per product
5. Image Background: white/transparent
Adhering to these specifications will help create a seamless and optimized shopping experience for all users.
By following these easy steps, you can efficiently add and manage your products on in your dashboard, making it a seamless experience for both you as a vendor and your customers alike. Slick Mall’s user-friendly approach empowers all vendors to showcase their offerings effectively and contribute to the success of the marketplace.

Product Information and Management
When dealing with product information, there are several key details to consider: the title, price, and description. Additionally, there is an option for a discount price, which can be scheduled for a specific period. By setting a starting date and an end date, automatic discounts can be applied to the product during the designated time frame.
The management of categories and tags is crucial to maintaining organization and consistency in the product catalog. Categories and tags are essential for effective product sorting and searching. To ensure proper control and avoid duplicates, the creation of categories and tags is limited to administrators only. Vendors, on the other hand, can only select from the pre-existing categories and tags available in the frontend dashboard.
When selecting a category for a product, the default setting allows for singular category selection. This means there is a drop-down menu where vendors can choose one category that best fits the product. Following this approach aligns with Google Webmaster Guidelines and other SEO and UX best practices, as it is recommended to assign only one category to a product to enhance visibility and user experience. If, however, a product needs to be listed under multiple categories for various reasons such as searching or sorting, vendors can use tags for this purpose.
Vendors are required to select the most suitable category from the provided drop-down menu. If there is a genuine need for products to belong to multiple categories simultaneously, vendor will have to contact an administrator since the responsibility of creating new categories lies with the administrators.

Upon clicking, a pop-up will appear, prompting you to select the categories. You also have the option to search for categories. Simply enter the category name in the search box, and matching categories will be displayed. Click the “Done” button to complete the process of adding the categories.

Simple Product
These products are straightforward and do not have any variants. They are single and standalone items, meaning there is no need for additional information to define different versions or options.
Variable Product
A variable product refers to a product that comes in various types of variants. For instance, if you are selling a dress, it might be available in three different colors and sizes. This option allows you to add those specific colors and sizes to the product. Variations can be added based on any characteristic you prefer, such as the material used or the stitching style.
To create a variation from the frontend, the vendor needs to select “This Product Has Multiple Options.” Once selected, new fields will appear where the vendor can input the desired variations. If the admin has already created some variations from the backend, they can be chosen from the dropdown on the top right, and then by clicking “Add Option,” they will be added to the product. Moreover, if not all attributes are needed for the product, the vendor can choose to remove or add more as required.
For custom variations and attributes, the vendor should select “Custom Attributes” and then click “Add Option.” This will reveal two blank fields where the variation name and attributes can be input.
As a vendor you have the flexibility to add as many variations and attributes as needed. Once the setup is complete, checking the box “Create variation using those attributes” will prompt the system to generate all the possible combinations. You will then be prompted to add prices for each of these variations.
If there is a need to disable any variation, you can simply uncheck the box on the left side.
Please note that the quantity and variation picture adding function may not be immediately available. Save the product first to unlock these options. After saving the product, the fields above will have a pencil icon on the right, which can be clicked to add more details to the variations.
How to create a grouped product
Imagine you wish to sell a music album, but you also want to offer the individual tracks and visuals separately, in addition to selling the entire album as a whole. In this case, you would need to create a Grouped product.
Create Parent Group Product
To begin, the vendor should log in to their dashboard and proceed to create a new product by navigating to Vendor Dashboard → Products → Add New.
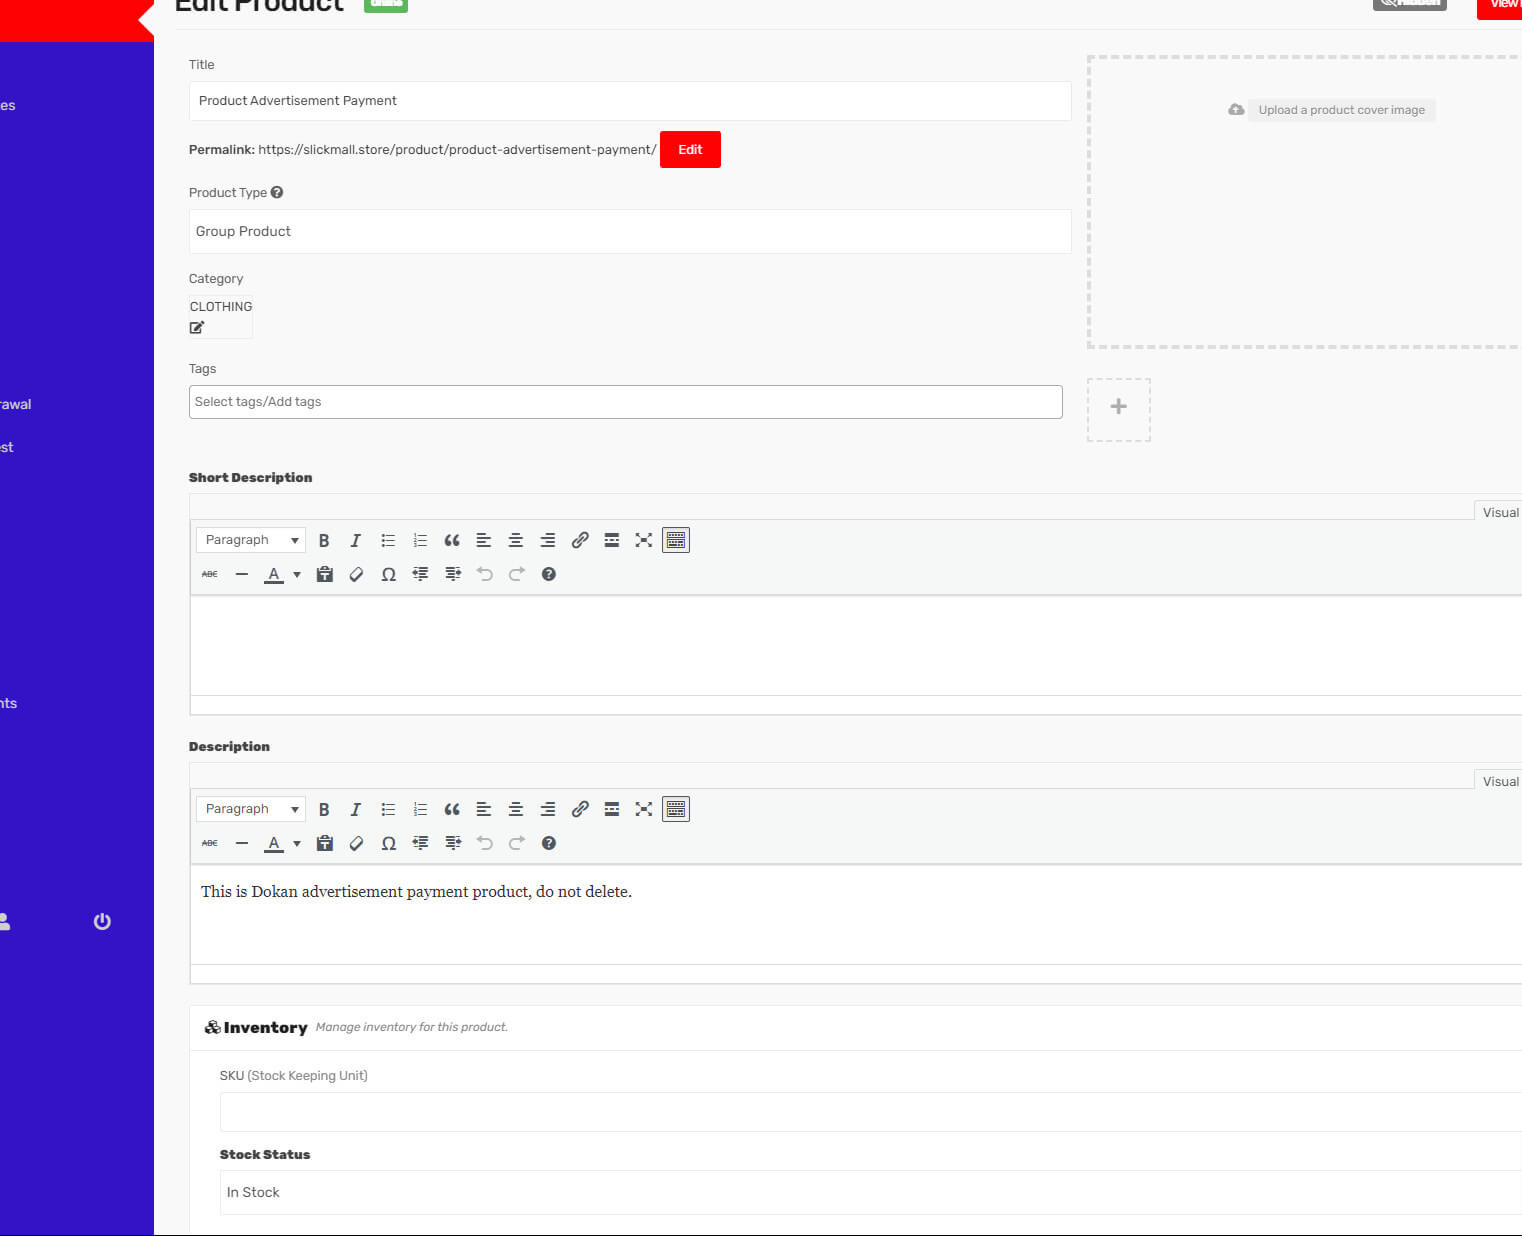
When creating the product, it is essential to ensure that the product category is set as a Group Product. This can be done by selecting “Group Product” from the options available in the Product Type drop-down menu.
It’s important to note that a group product acts as a parent product, and as such, there won’t be a price field to fill in. Additionally, the vendor must select a category for the group product. If the preferred category is not available, the vendor can contact the administrators to have it created.
Create Child Product
Navigate to Vendor dashboard→ Product→ Add new
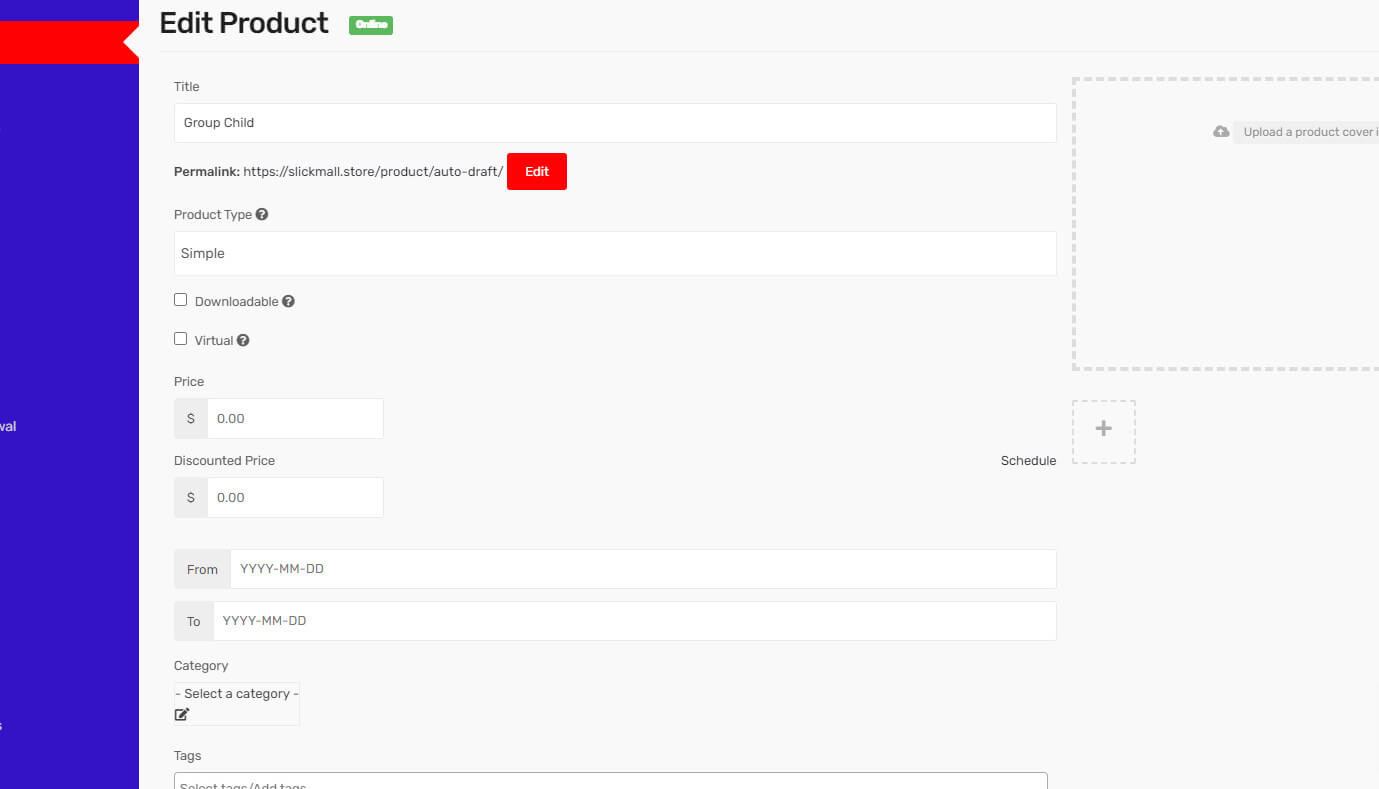
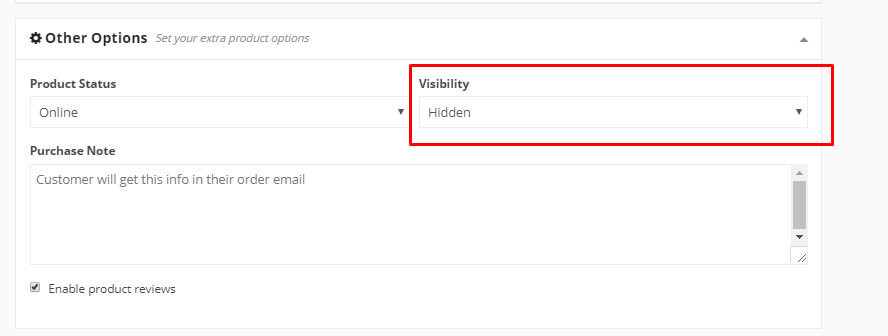
As this product serves as the child product, it is necessary for the category to match that of the parent product. Moreover, this specific product should be hidden from the catalog. To achieve this, you can find the visibility field under the “Other Options” section. Set the visibility to “Hidden” and proceed to save the product, as illustrated in the screenshot below:
Link the child product to the Parent product
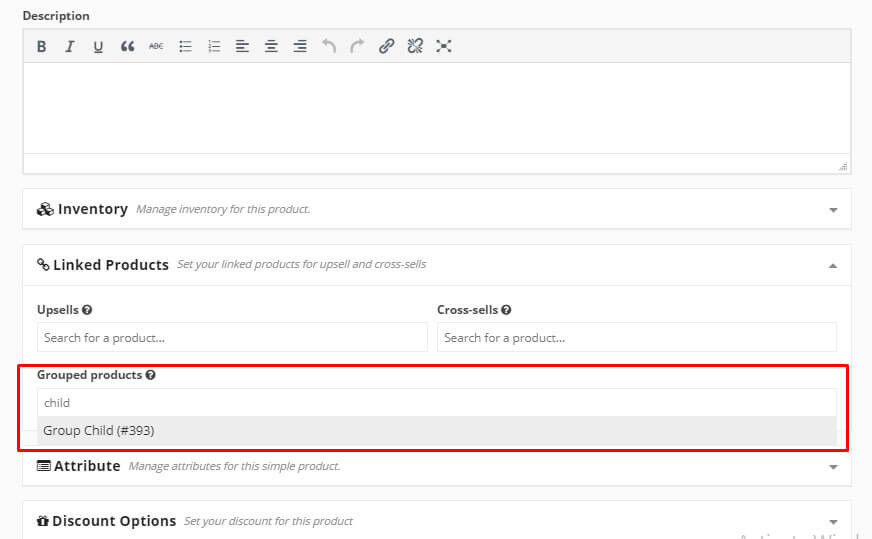
Return to the parent product and access the “Linked Product” option located under the “Inventory” section. From there, select the corresponding child product in the “Group Product” section and link them together.
If you encounter any difficulties, refer to the screenshot below for guidance.
Inventory and variants
This section contains some sort of a complex information. None of the fields in this section are mandatory. If your product is simple and you don’t need to include stock quantity, feel free to skip this part altogether.
However, if you’re offering downloadable products or selling items like dresses or t-shirts with multiple sizes, it is crucial to carefully review and understand this section.
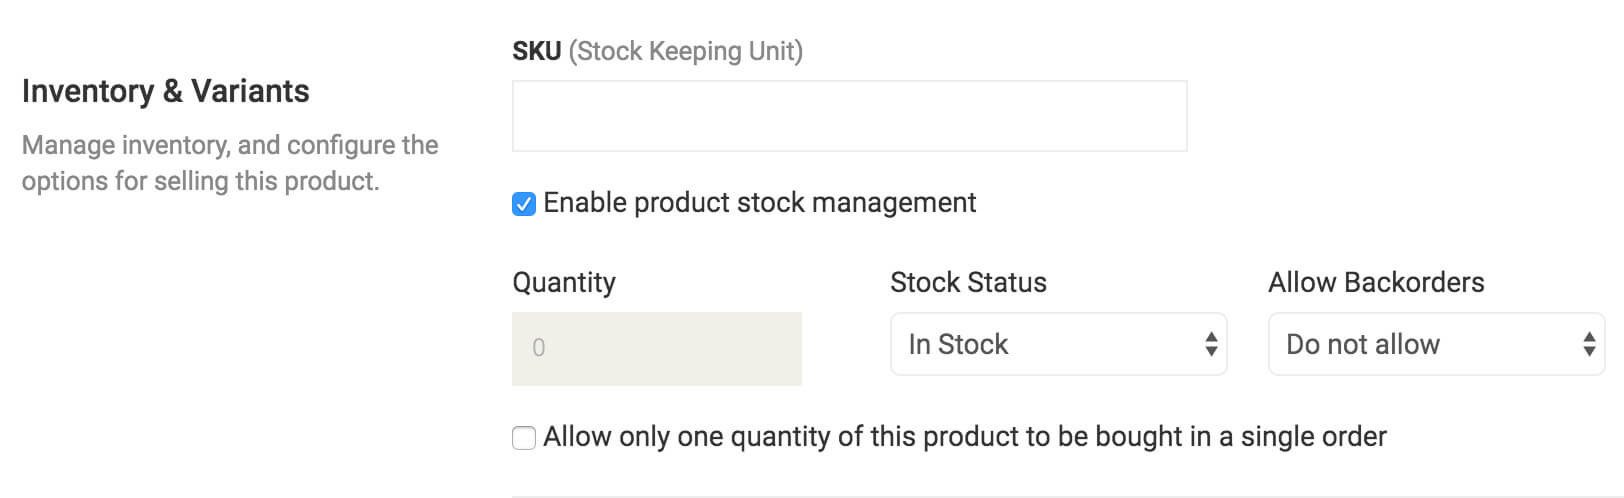
What is SKU?
SKU stands for Stock Keeping Unit, a unique set of characters that distinguishes each product from any other in your inventory.
Enabling Product Stock Management
Imagine you have 10 pieces of a product, and you don’t want to accept orders for more than the available stock. By enabling stock management and setting the quantity to 10, if 10 units are ordered, the product will display a message indicating that all quantities are sold, and no stock is left.
However, you may want to allow pre-orders before the next batch arrives. In such cases, you can choose to “Allow Back Order,” which enables customers to place orders even when the product is out of stock.
Downloadable Product
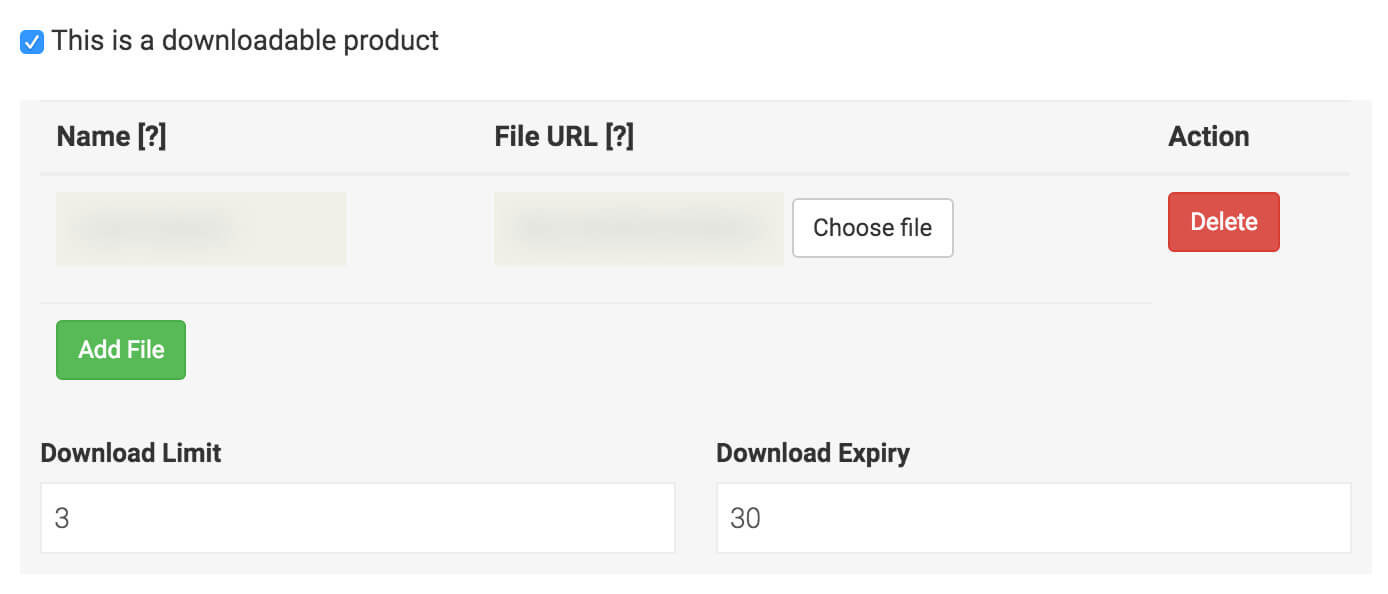
If you’re selling digital products such as photos, music, or software, this is the option you should use. By clicking on the “Add File” button, three additional fields will appear.
The “Name” field allows you to define the desired downloaded file name. This is particularly useful when the original file has a complex name like “sam-new-album-updated-jan-23.zip,” but you want the user to download it as “Sam New Album.” With this option, you can serve and organize the files in a user-friendly manner.
You have the flexibility to serve the files either from your own website by clicking “Choose File and Select,” or from third-party platforms like Dropbox, Google Drive, or any other preferred file hosting site.
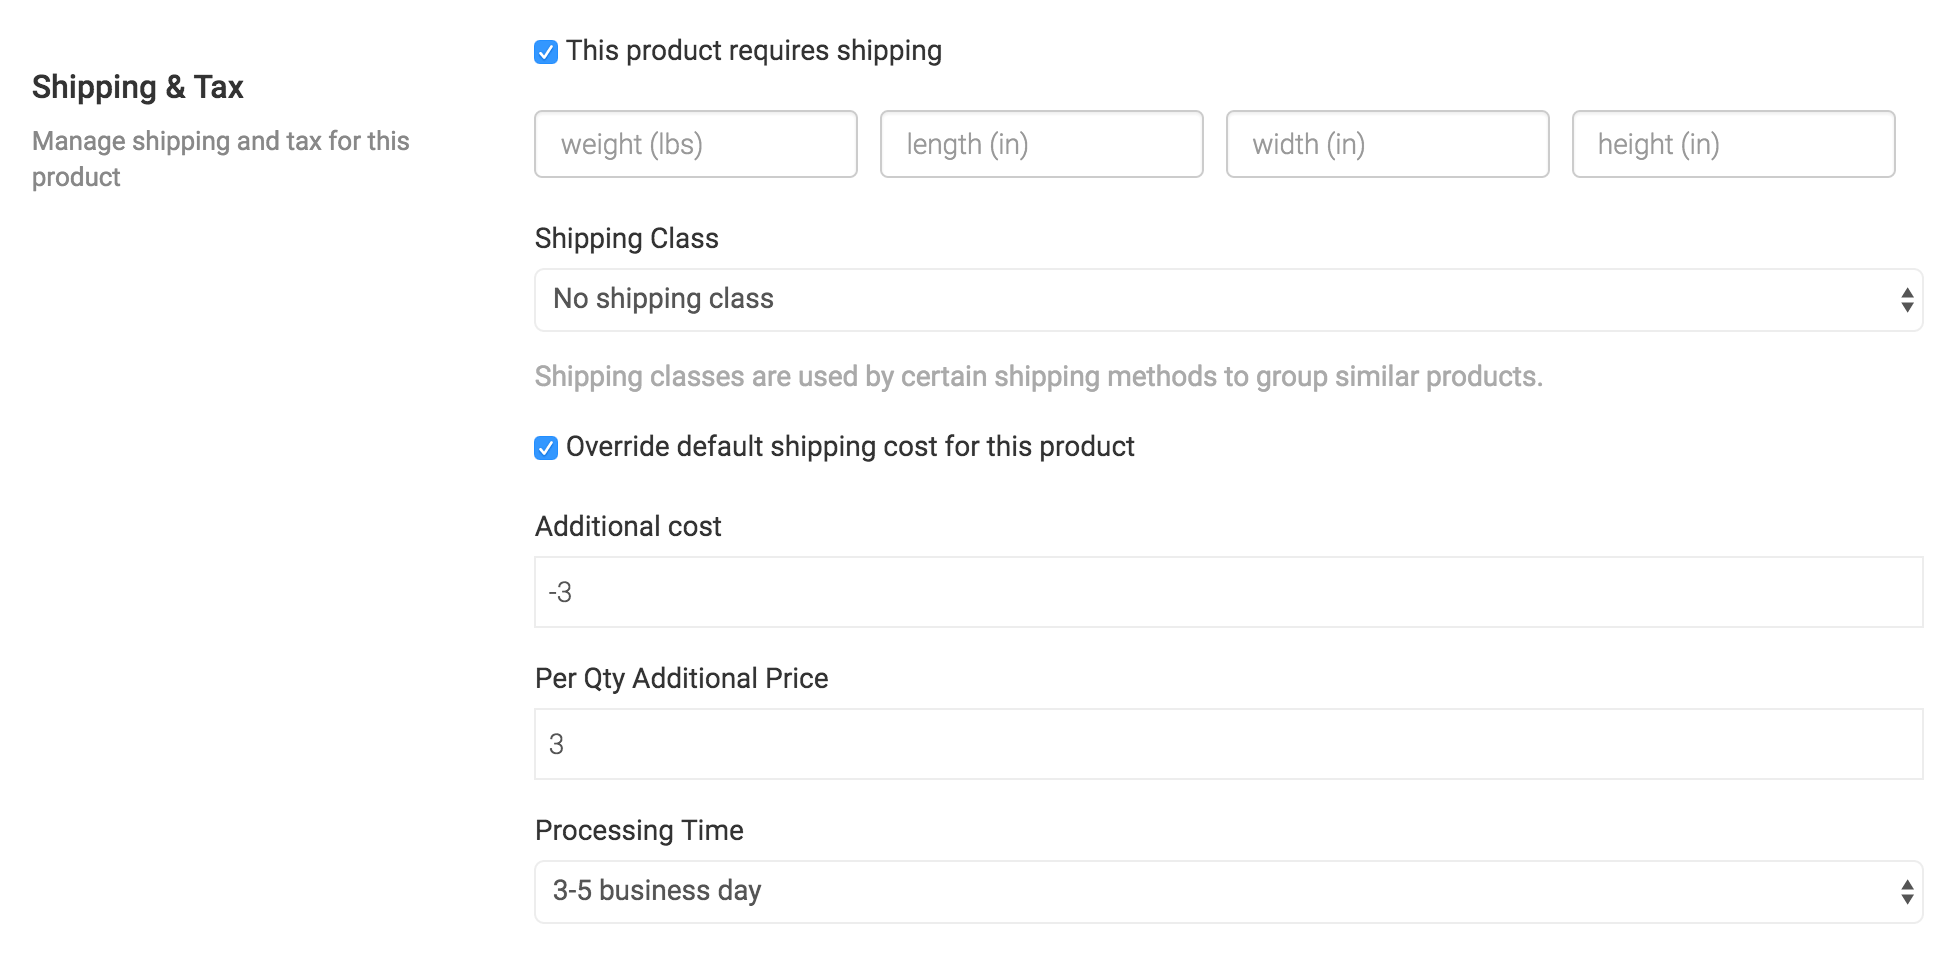
Shipping
As a vendor, you are required to activate the shipping method from your dashboard settings.
To use the state-based shipping feature of Slick Mall, you must first activate it within the Vendor Dashboard Settings. Once activated, you will have the option to set default shipping prices, or else you can simply select the shipping class without any mandatory fields in the section below.
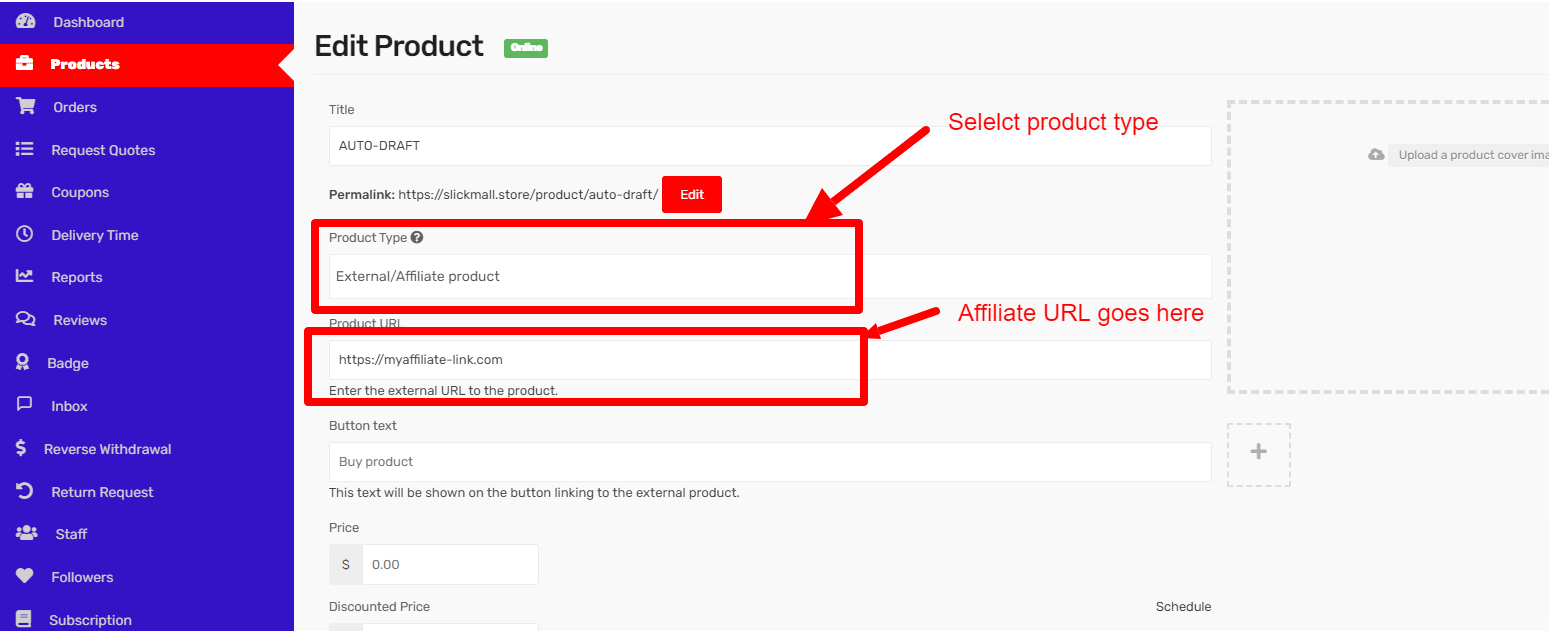
External/Affiliate Product
On Slick Mall, it is possible to create External/Affiliate products. This allows you to generate products and direct customers to your affiliated websites. When creating a product, you must choose the “External/Affiliate” product type from the dropdown menu. Furthermore, you need to provide the link to your site in the designated URL section and specify the button name.
Wholesale
Slickmall, your gateway to a thriving wholesale marketplace that connects vendors and wholesalers in a seamless and efficient manner. Our platform has been designed to elevate your selling experience while fostering valuable partnerships. Let’s dive into the details:
At Slickmall, vendors are equipped with a powerful platform to list their products and reach a wider audience of wholesalers. Whether you specialize in unique merchandise, high-demand items, or exclusive collections, Slickmall provides a dynamic space for you to showcase your offerings. Our user-friendly interface makes listing and managing products a breeze, enabling you to focus on what you do best – creating exceptional products.
Slickmall extends a warm welcome to wholesalers seeking for opportunities to sell their products inventory in bulk. Our platform is a treasure trove of diverse items, catering to various industries and preferences. Discover an array of products, ranging from fashion and electronics to home goods and more. With Slickmall, you can efficiently browse through vendors’ listings, negotiate terms, and establish lasting partnerships that drive your business forward.
Imagine the possibilities of forging connections in a thriving wholesale ecosystem. For vendors, Slickmall is your gateway to expanding your market reach and forming valuable partnerships. For wholesalers, it’s a one-stop destination for selling in bulk.
Whether you’re a seasoned vendor looking to diversify your distribution channels or a wholesaler seeking to off-load your product lineup, Slickmall provides the platform and support you need to succeed. Our team is always ready to assist you, ensuring that your experience is seamless and rewarding.
So, let’s embark on this wholesale journey together. Explore the platform, connect with potential partners, and witness the transformation of your business.
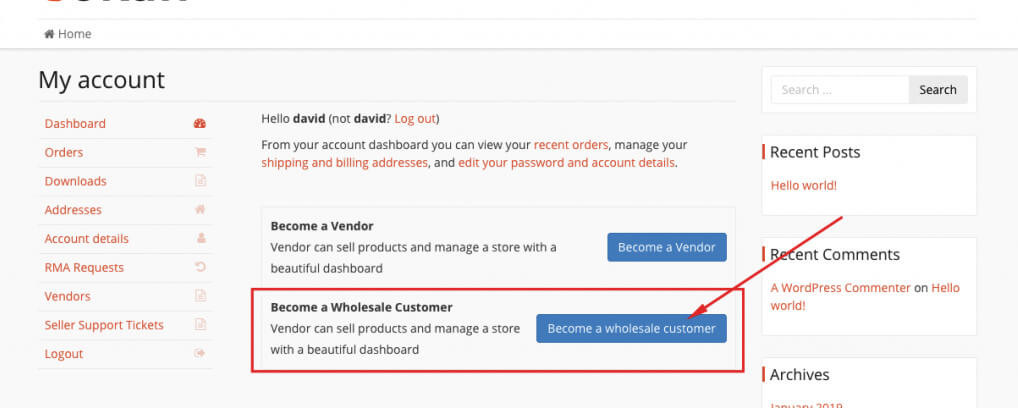
Becoming a Wholesale Customer
To become a wholesale customer, individuals need to visit their respective “My Account” page and complete the application process.
Vendor Settings/Configuration
For Existing Product
Vendors have the ability to configure wholesale pricing for both simple and digital products that already exist. To establish the wholesale price for a specific product, vendors must access the product’s edit page.
To accomplish this, vendors should follow these steps:
1. Go to the Vendor Dashboard.
2. Navigate to the “Products” section.
3. Choose the desired product.
4. Select “Edit Product.”
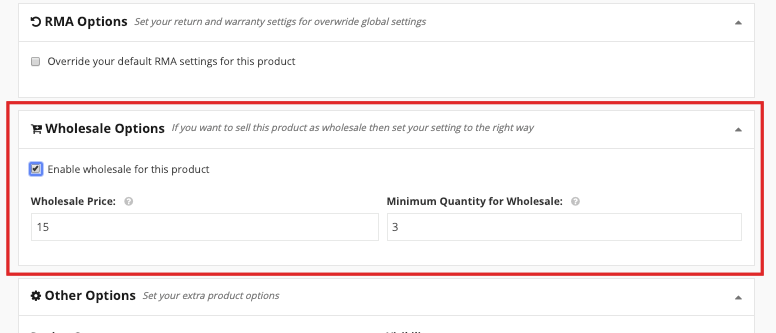
5. Access the “Wholesale Options” for setting the wholesale price.
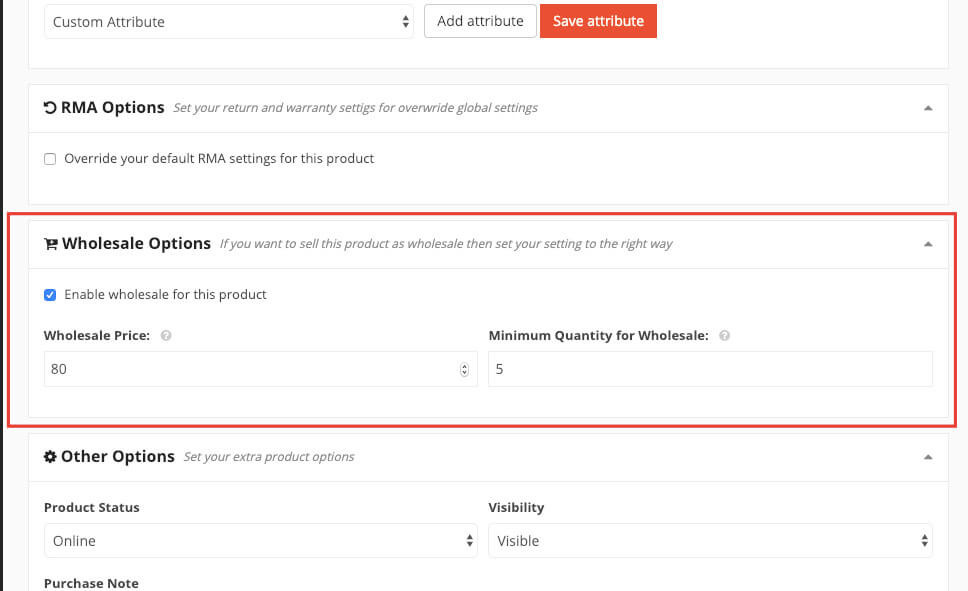
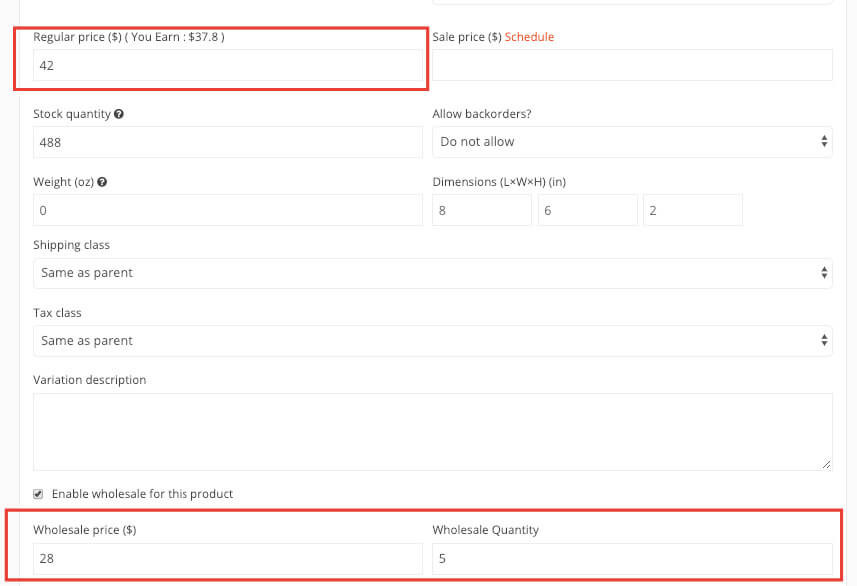
To utilize this feature, a vendor needs to mark the “Enable wholesale for this product” checkbox. Following this, they should define the “Wholesale Price” and specify the “Minimum Quantity for Wholesale.”
Wholesale Price for existing Variable Product
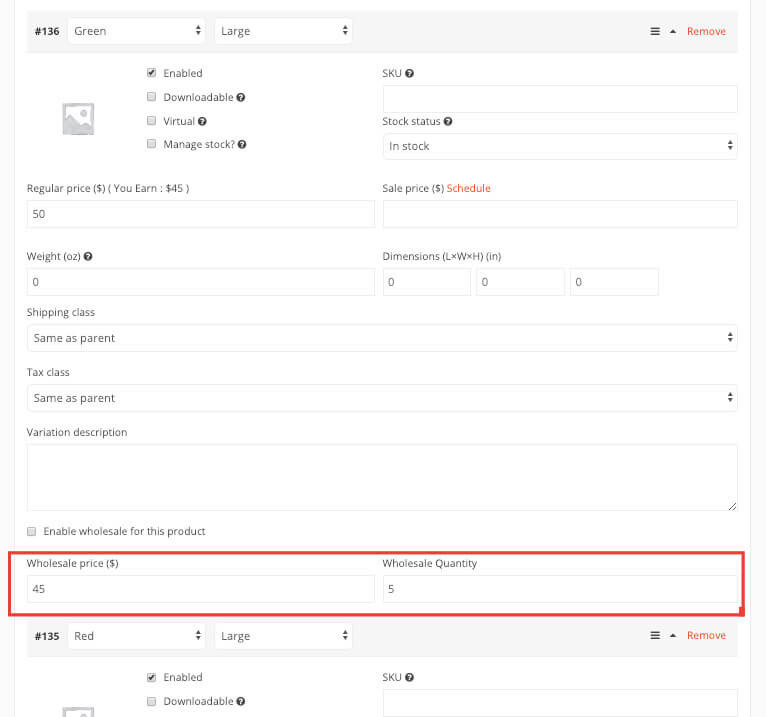
If a vendor intends to establish the “Wholesale Price” and the “Minimum Quantity for Wholesale” for a variable product, they should configure these parameters individually for each variation.
For instance, a vendor might have a product with variations like Large Green, Large Red, Small Green, Small Red, and so on. It is necessary for the vendor to define the “Regular Price” and the “Wholesale Price” for each of these variations, along with specifying the corresponding “Minimum Quantity for Wholesale.” Refer to the screenshot provided below:
Wholesale Price for a New Simple Product
To set up the Dokan Wholesale option for a new product, a vendor should follow these steps:
1. Access the Dashboard or Vendor Dashboard.
2. Navigate to the “Products” section.
3. Select “Add New Product.”
4. Create the product as needed.
5. Proceed to the “Wholesale Options” section.
6. Activate the “Wholesale for this product” checkbox.
7. Once enabled, define the wholesale price and quantity.
Wholesale Price for a New Variable Product
To set up the Dokan Wholesale option for a new variable product, the vendor should follow these steps:
1. Access the Dashboard or Vendor Dashboard.
2. Navigate to the “Products” section.
3. Select “Add New Product.”
4. Create the product as needed.
5. Choose the “Create Variable Product” option.
6. Proceed to the “Wholesale Options” section.
7. Activate the “Wholesale for this product” checkbox.
Slickmall introduces an exciting dimension for vendors, enabling them to effortlessly create products that can be auctioned. This innovative feature empowers vendors to tap into the dynamic world of online auctions, expanding their selling horizons beyond traditional methods.
Imagine the possibilities: vendors can now showcase unique items, collectibles, or exclusive offerings through engaging auction events. Whether you’re a seasoned seller or just exploring new avenues, Slickmall’s auction functionality adds a captivating layer to your online marketplace.
From antiques to limited-edition releases, the auction format caters to a diverse range of products, attracting bidders and enthusiasts alike. This not only enriches the vendor’s experience but also captivates customers with interactive and competitive buying experiences.
Don’t miss out on the chance to leverage this auction-able feature to elevate your online business.
How to Use Auctions
Start by accessing the dashboard, and you’ll then notice the menu item labeled “Auction”. This indicates a different product classification, requiring extra information. Moreover, you might contemplate isolating auction products within their dedicated tab.
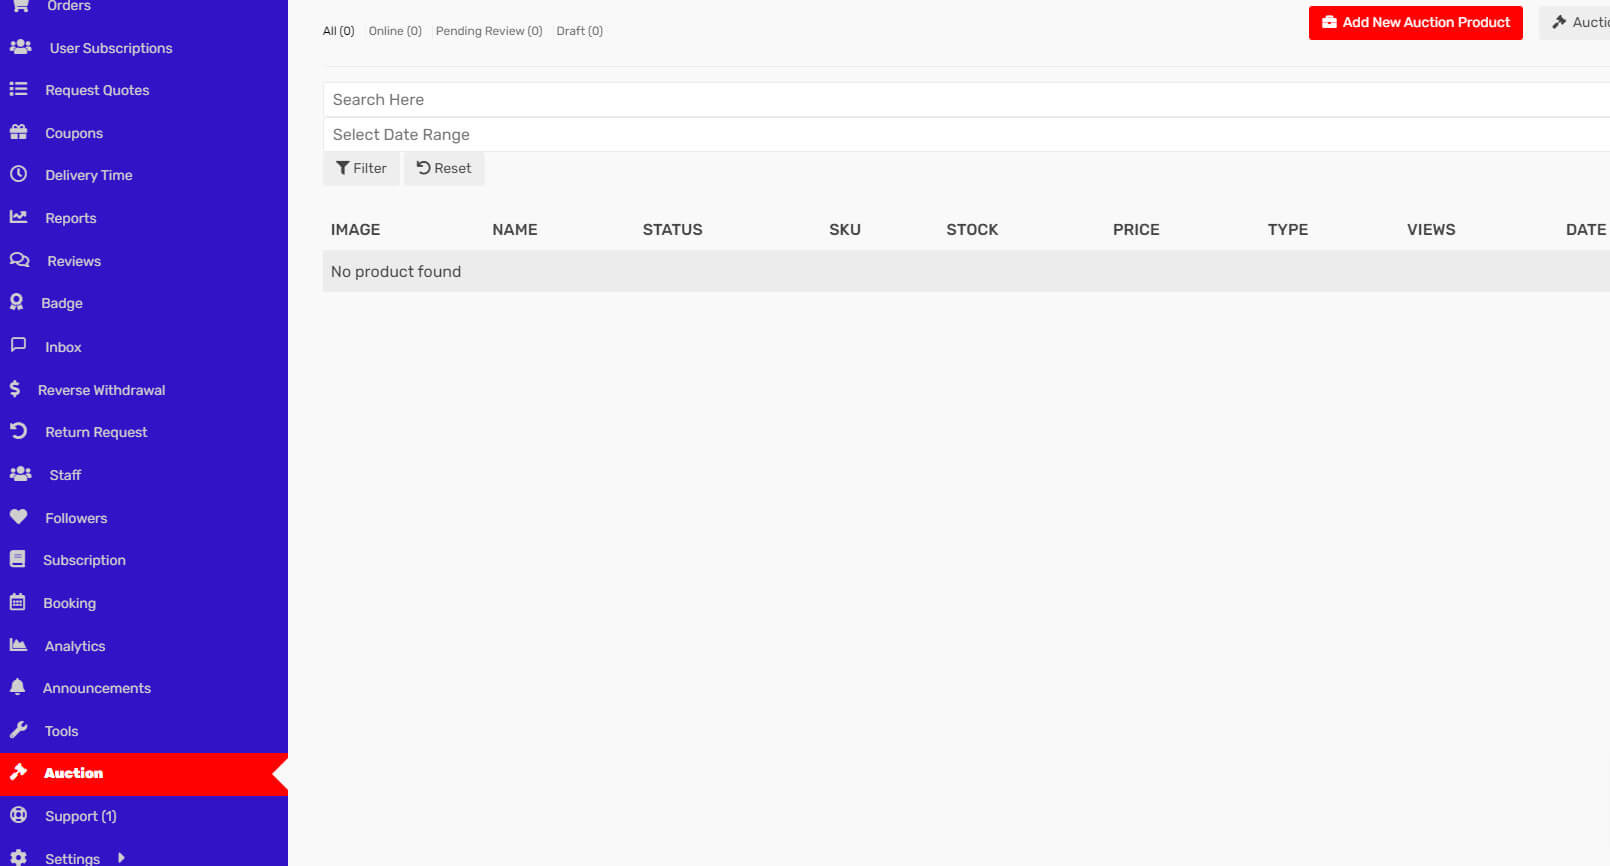
Creating Auction Products
This page closely resembles the primary products page. Please click the “Add New Auction Product” button. Upon doing so, you will be directed to a new page for inputting data related to a fresh auction product.
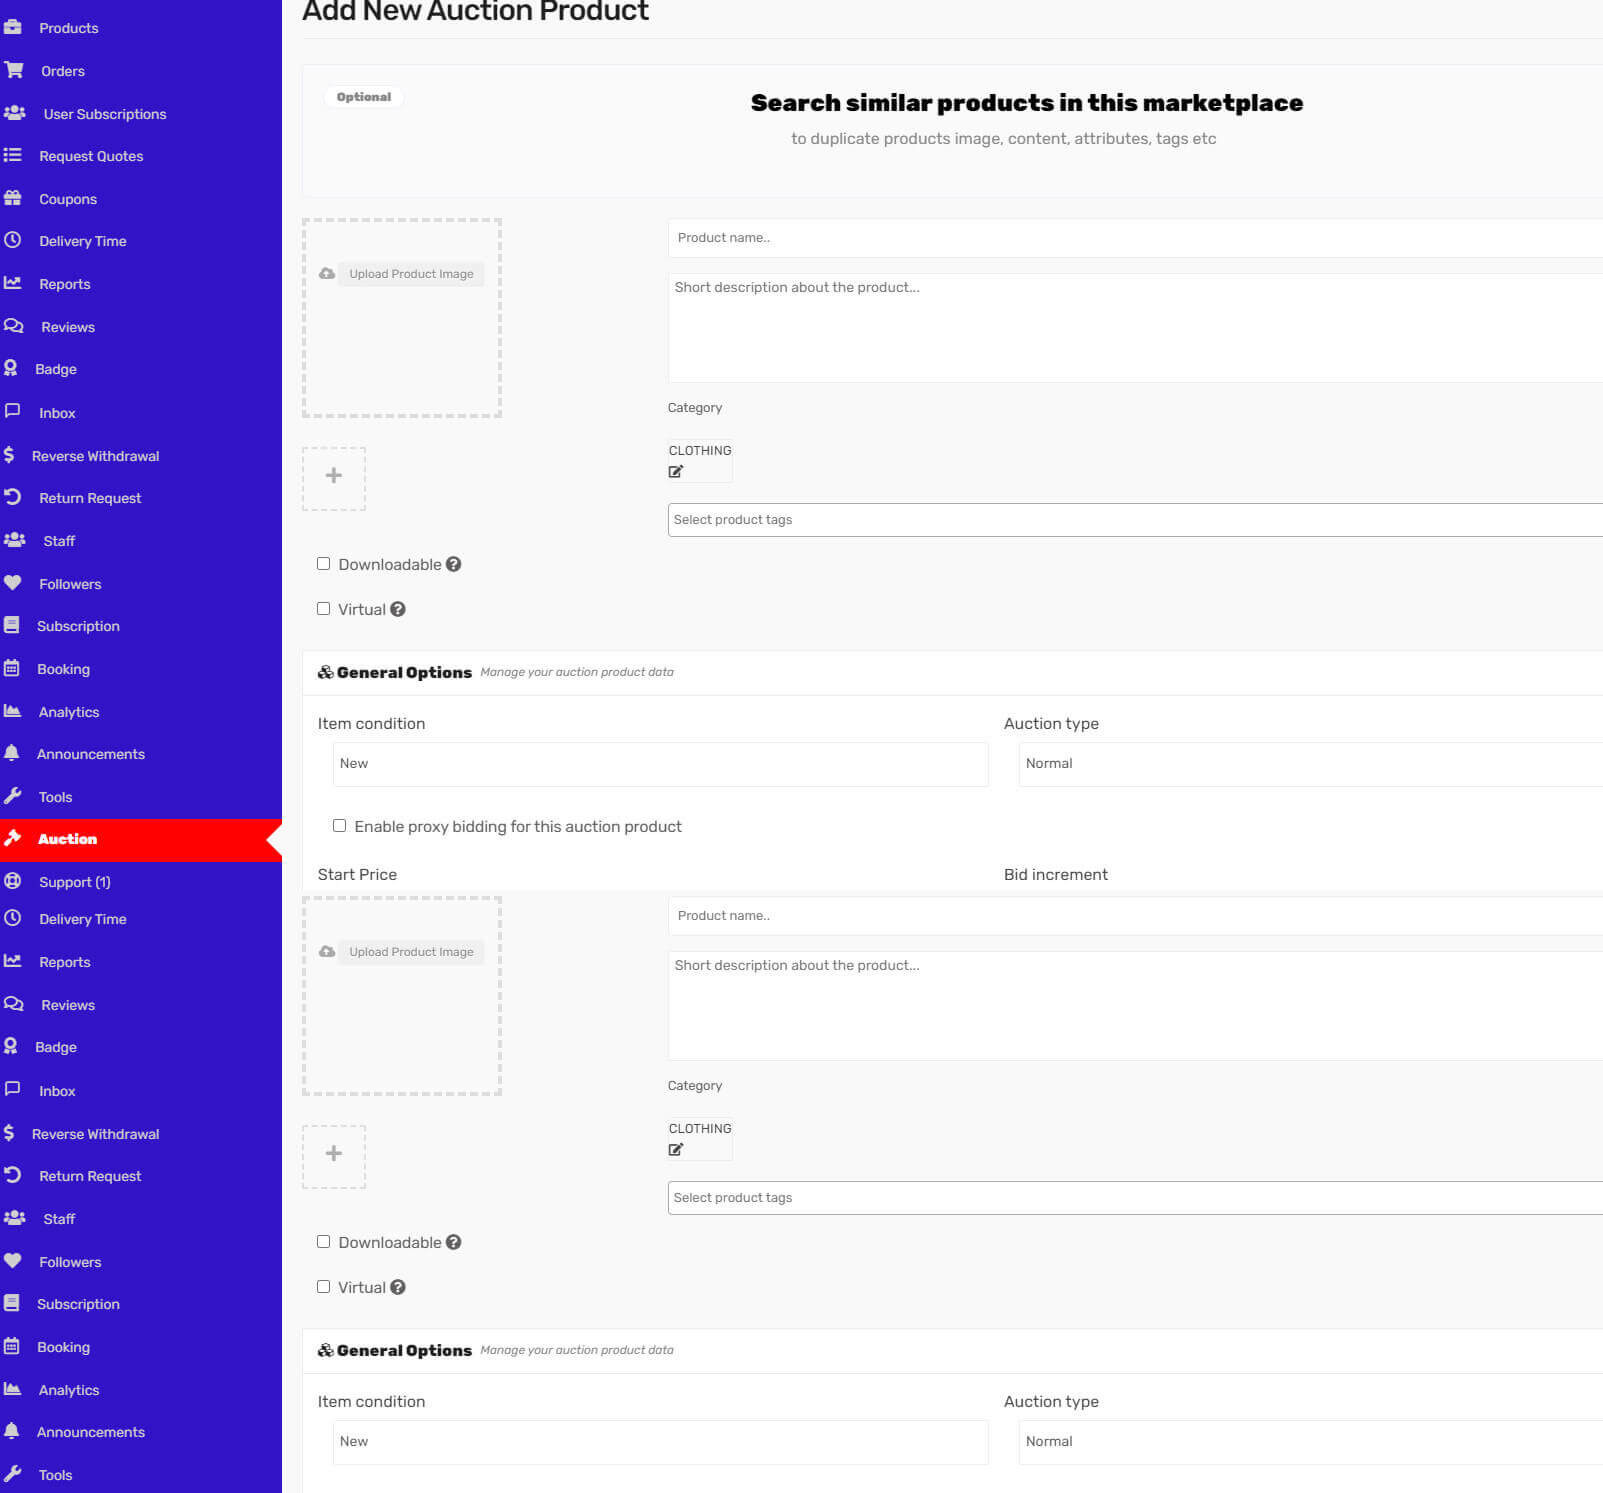
The initial fields are consistent and largely self-explanatory, allowing us to move past this portion.
Start Price: This figure represents the minimum opening bid. Bidding activities will commence from this point. For example, if you establish a starting price of $20, the bidding will originate from $20, progressing with each subsequent bid submitted by customers.
Bid Increment: This pertains to the amount by which each customer can raise the bid during the auction. Suppose you set a commencement price of $20 with an increment of $2. As customers engage in bidding, the bid values will increase in increments of $2, such as $22, $24, $26, and so forth.
Reserved Price: A reserved price denotes the lowest amount at which you are willing to finalize the sale of your item. When you wish to avoid selling an item below a specific price, a reserved price can be set. While the value of your reserve price remains undisclosed to bidders, they will be informed that the auction carries a reserved price, along with whether the reserve condition has been satisfied. Should a bidder fail to meet this reserve, you hold no obligation to complete the sale of your item.
Buy It Now Price: The “Buy It Now” option disappears once bidding surpasses the predetermined “Buy It Now” price for a standard auction or falls below it for a reverse auction scenario.

Auction Start Date: Specify the date on which you intend to initiate the auction. This can be either the present time or a future time, say 6 days from present day.
Auction End Date: Indicate the time at which you intend to conclude bid acceptance. Beyond this set time, individuals will no longer have the capability to place bids on the respective product. Optionally, you can choose to conceal expired auction products through the Simple Auction Settings.
Adding Attributes to Auction Products
During the editing process of an auction product, you have the capability to introduce various categories of attributes.
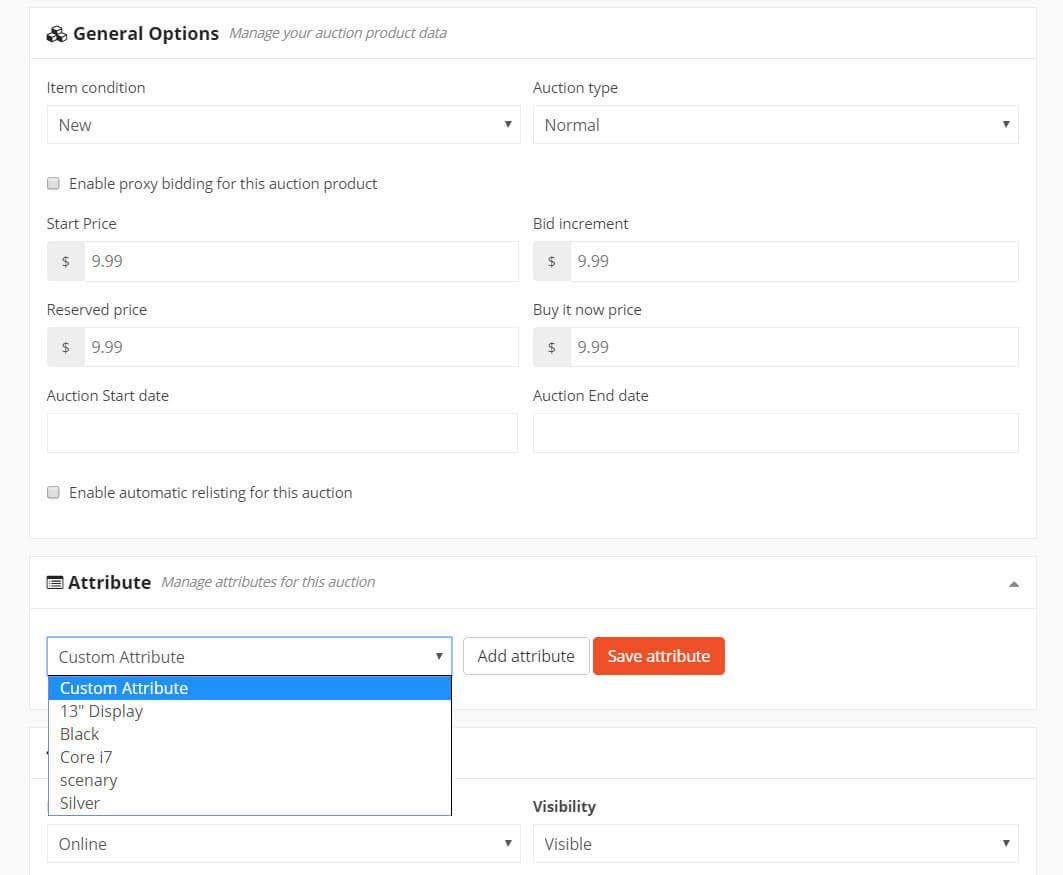
Through this segment, you can generate diverse iterations of your auction product. To achieve this, you are required to either pick an attribute from the dropdown menu or generate a customized one. Click the “Add Attribute” button to proceed.
Upon selection, you will encounter additional choices. You can enhance the attribute’s visibility for your product by selecting the corresponding option. Subsequently, you must incorporate values that were previously established on the attributes page. This process extends to the selection of all relevant attributes.
Once all attributes have been included, proceed by clicking the “Save Attribute” button. To conclude, ensure you update your product.
Welcome to the dynamic world of Slickmall, where vendors and customers unite to create unique booking experiences. Our platform opens the door to an array of opportunities, allowing vendors to craft bookable products and customers to tailor their bookings to their preferences. Let’s delve into the exciting details:
Slickmall empowers vendors with the ability to seamlessly create bookable products that cater to a wide range of industries. Whether you’re in the realm of car rentals, offering appointment-based services, or exploring new avenues, our platform equips you with the tools you need. You can effortlessly set up and manage your offerings, ensuring a seamless experience for both you and your customers.
Experience the freedom to customize your bookings like never before. Slickmall offers a user-friendly interface that allows you to tailor your orders according to your needs. Whether you’re renting a car for a weekend getaway, scheduling appointments for services, or exploring unique offerings, our platform puts you in the driver’s seat. With just a few clicks, you can create bookings that align perfectly with your preferences.
Carve out your niche in the market with Slickmall’s versatile features. If you’re a vendor, imagine the potential of offering tailored services and products that cater to your customers’ unique requirements. And if you’re a customer, envision the convenience of crafting bookings that fit seamlessly into your schedule and preferences.
Whether you’re a seasoned professional or new to the world of online bookings, Slickmall is designed to cater to your journey. Our support team is readily available to provide assistance and guidance, ensuring that your experience with us is both fruitful and enjoyable.
So, take the leap and dive into the world of Slickmall. Explore, create, and engage with a community of like-minded individuals who share your passion. Your journey towards enhanced bookings and personalized experiences begins here.
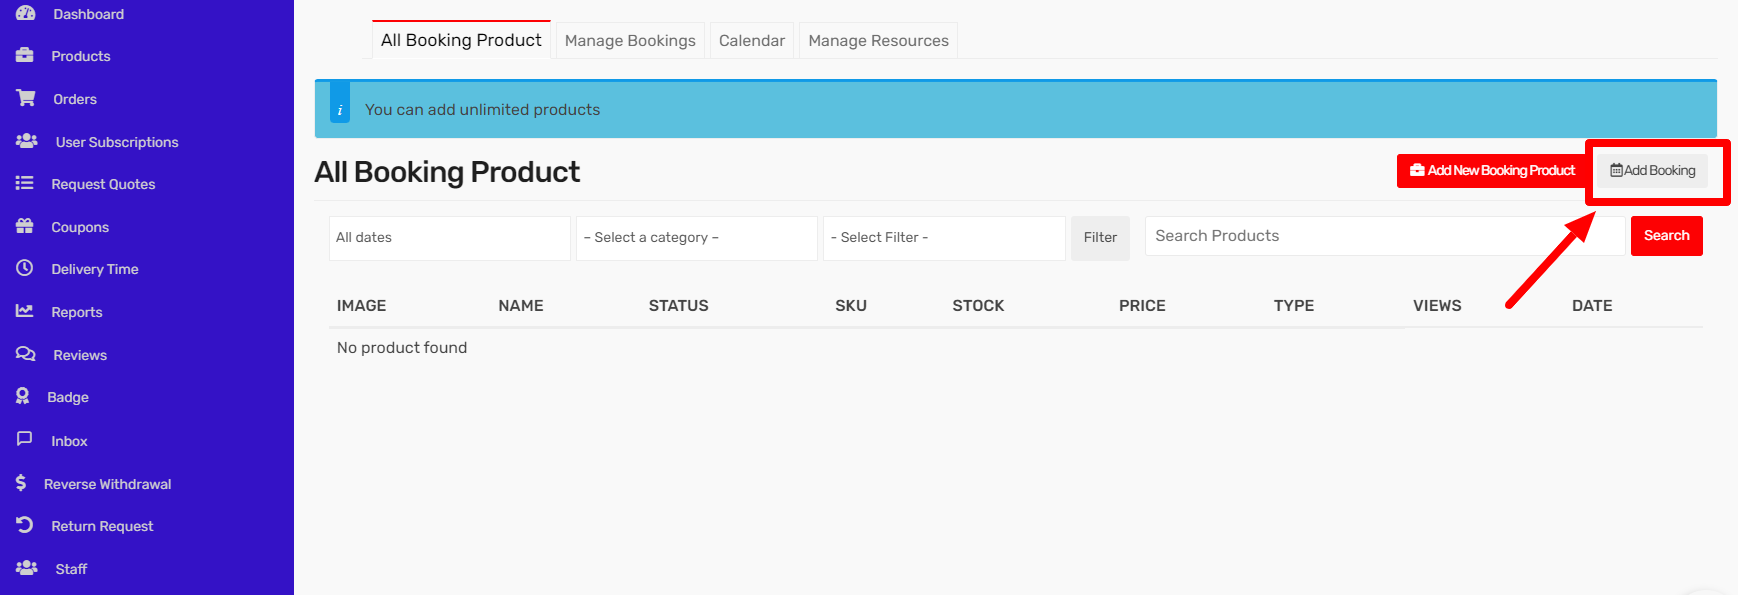
Access the Vendor Dashboard and navigate to the “Bookings” section to view the available choices.
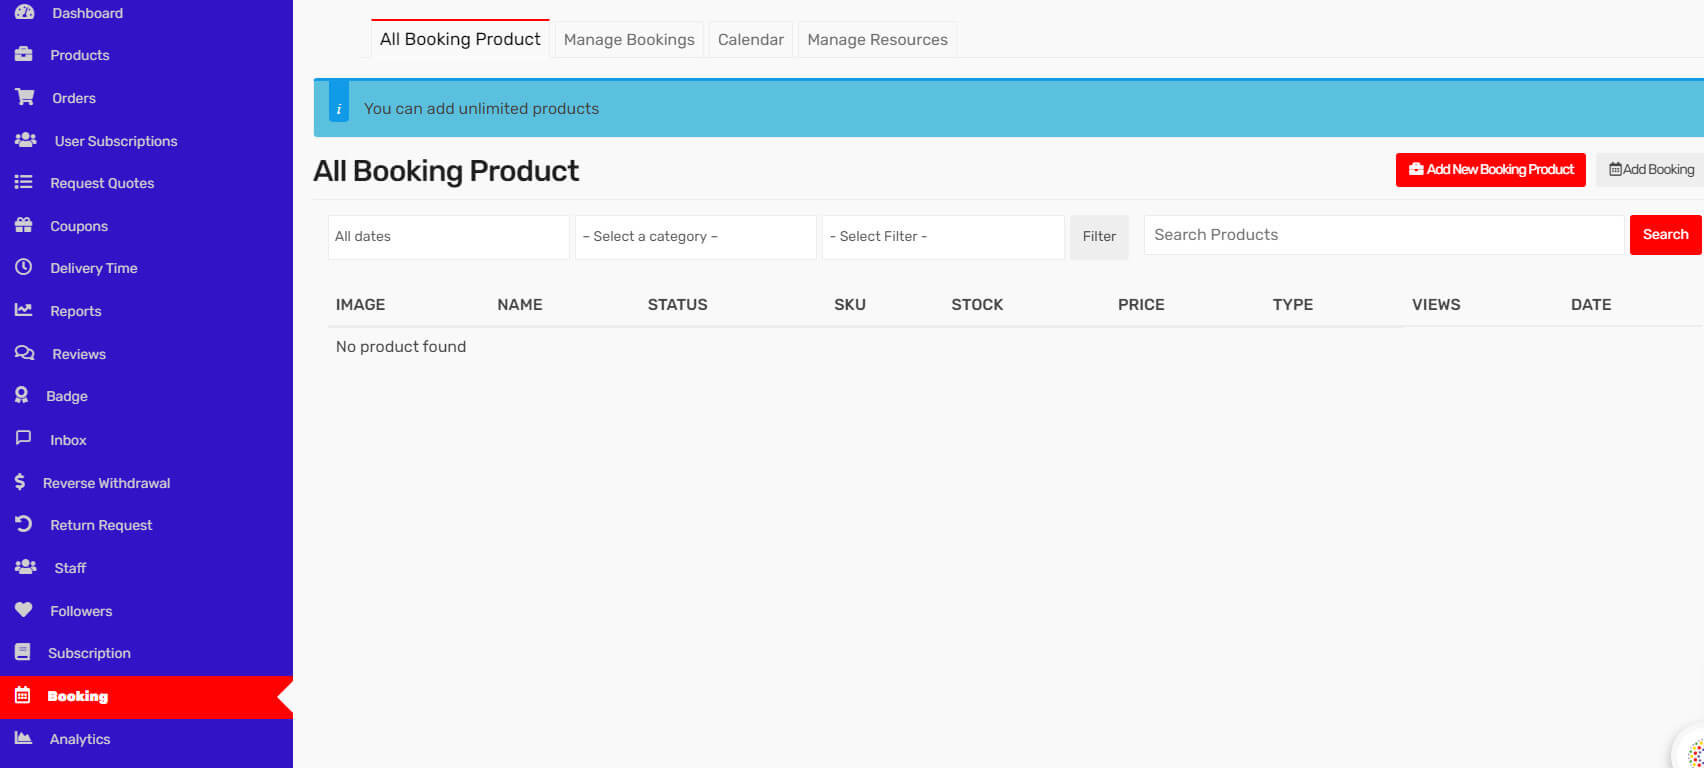
Create a new Booking product
To begin, click on “Add New Product.” You’ll notice a form that closely resembles the one for adding regular products, but with a distinct section beneath the basics. Don’t worry, we’ll guide you through each part to make it simple to grasp. Keep in mind, though, that bookings are highly customizable products with intricate relationships, so pay close attention.
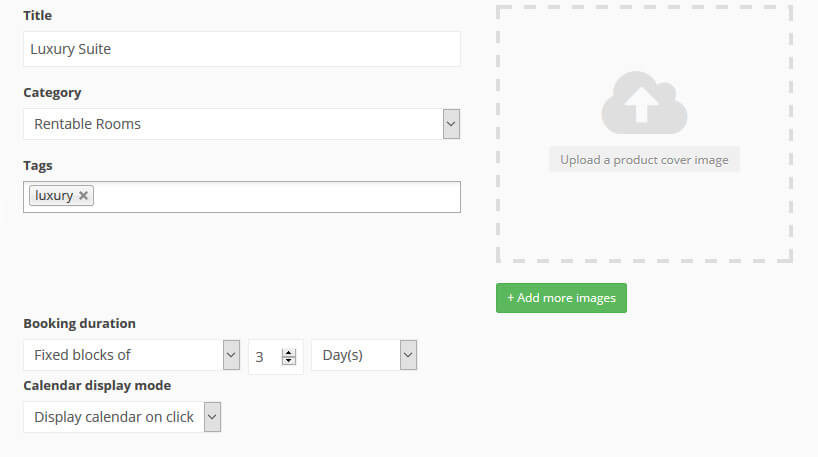
Let’s start with the fundamental section. It’s quite straightforward, so no need to worry.
Understanding Booking Duration:
This field empowers you to establish the duration of your product, determining the span of time each customer’s purchase covers. Imagine you run a motel and you only want to rent out your premium room for a minimum of three days. In this case, you’d set the block duration to three days. On the other hand, when dealing with your standard rooms, you might set the booking duration to just one day.
Exploring Calendar Display Modes:
The calendar on your product page showcases availability. This field lets you control whether the calendar is expanded by default or appears as a clickable button. It’s a simple on/off setting that influences the way the calendar is initially presented.

Delving into Advanced Availability:
Now we’re entering a slightly more intricate area. This section addresses availability through four distinct dimensions: frequency, capacity, range, and time.
Understanding “Blocks”:
Grasping this concept will simplify the subsequent information. A block represents the smallest unit of your product that you make available for booking. Unlike conventional products that aren’t time-dependent, booking products rely on time, often linked to maintenance and typically without shipping.
Deciphering “Max Bookings per Block”:
This field empowers you to book the same product multiple times within the designated timeframe. For instance, if I have two Luxury suites and I intend to rent out both, this single bookable product accommodates both suites.
Exploring “Minimum Booking Window”:
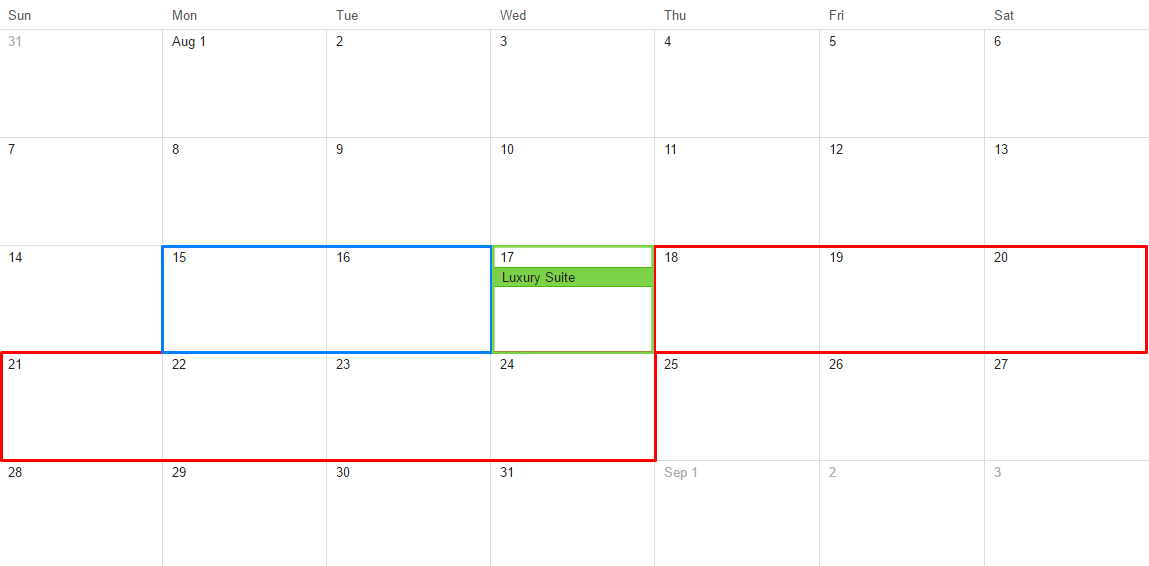
This signifies the shortest time span within which a customer must book your next available product. For instance, if your upcoming product is available on the 17th of this month, but you require at least a 2-day window before that for booking, this parameter sets that constraint.
Understanding “Maximum Booking Window”:
This represents the widest span of available booking for the product from the next available date. If, for instance, your product’s next available booking is scheduled for the 17th of this month and the maximum booking window is set to 7 days, the product page will display booking availability up to the 24th.
To help illustrate how these dates function, here’s a calendar-based example:
Understanding Buffer Period:
Buffer period allows you to allocate time to rejuvenate your asset or product after each order or service is completed. If your day comprises multiple booking blocks, it’s likely that you’ll require intervals in between for maintenance. Think of it as the time you need to refresh your Luxury Suite and prepare it for the next guest – you could set a buffer time of 30 minutes for this purpose. If no delay is necessary, simply set it to 0.
Notably, the buffer period unit adjusts automatically in sync with your block duration.
Exploring “All Dates Are – Not Available by Default”:
By selecting this option, your custom availability settings will take effect, granting you greater control over availability ranges.
Setting Availability Range:
Within each field, you’ll find a helpful (?) hint text that provides context for every parameter.
Determine the range for your booking availability, be it in days, months, hours, or even minutes – the flexibility is yours. You can also easily adjust priorities by dragging items as needed.
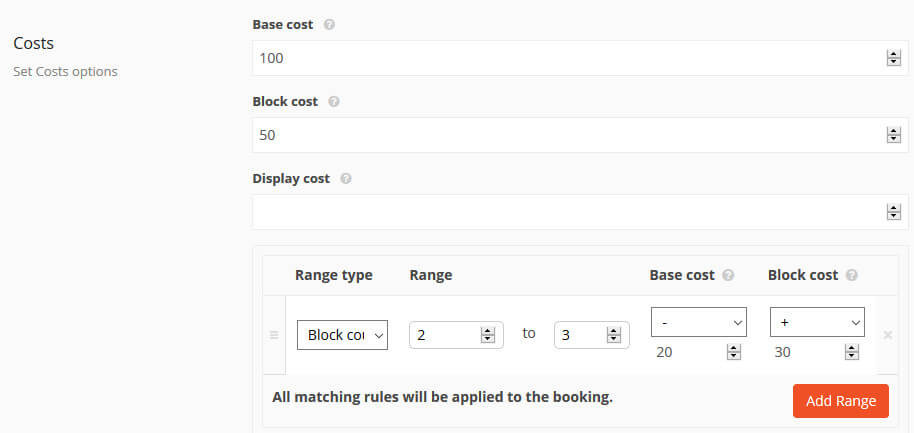
Exploring Pricing Options:
This segment is refreshingly simple to navigate. Let’s break it down:
-Base Cost: Every product starts with a fundamental cost – the foundation of your pricing structure.
-Block Costs: These adapt according to order volume. They’re designed to accommodate changes as your order quantity shifts.
-Display Cost: Think of this as a way to provide an initial cost estimate. If you choose to leave it blank, the cost adjusts in response to your customer’s order modifications. Essentially, it can act as a minimum cost per order if you decide to use it that way.
Remember, this section is designed to give you flexibility and control over your pricing strategy. If you have any queries or need further clarification, don’t hesitate to ask.

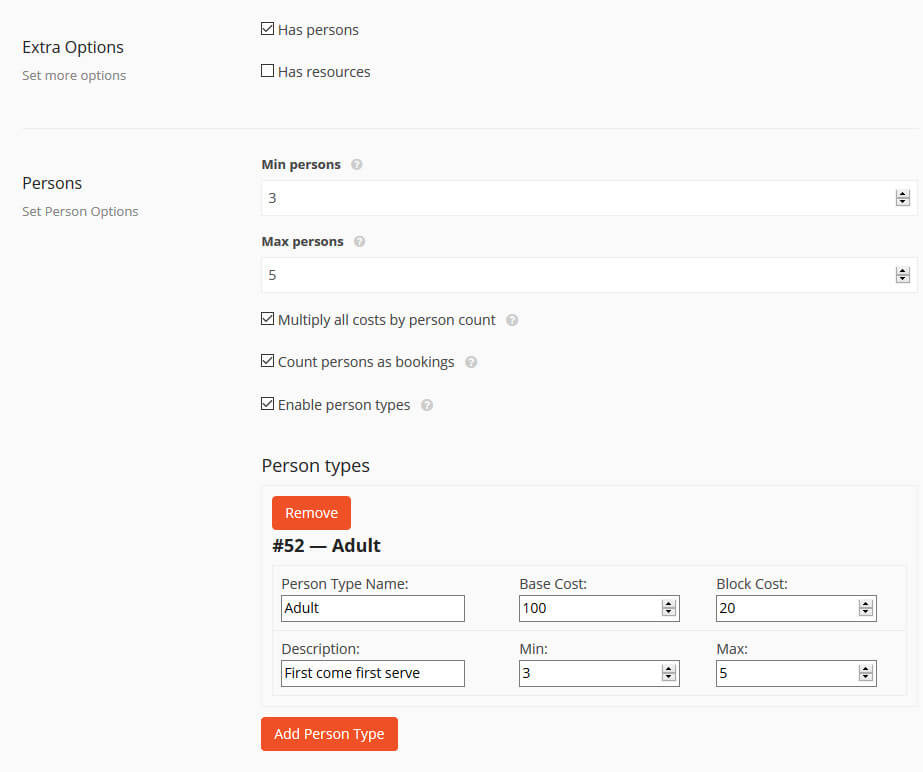
What is Has Persons?
Feel free to check this box if your product is available for booking across various person groups. Take a look – you’ll also notice the option to establish seat limits and costs that vary based on the specific person group.
This feature adds a layer of flexibility to your bookings, catering to different group sizes and preferences. If you have any questions or need further assistance, don’t hesitate to reach out.
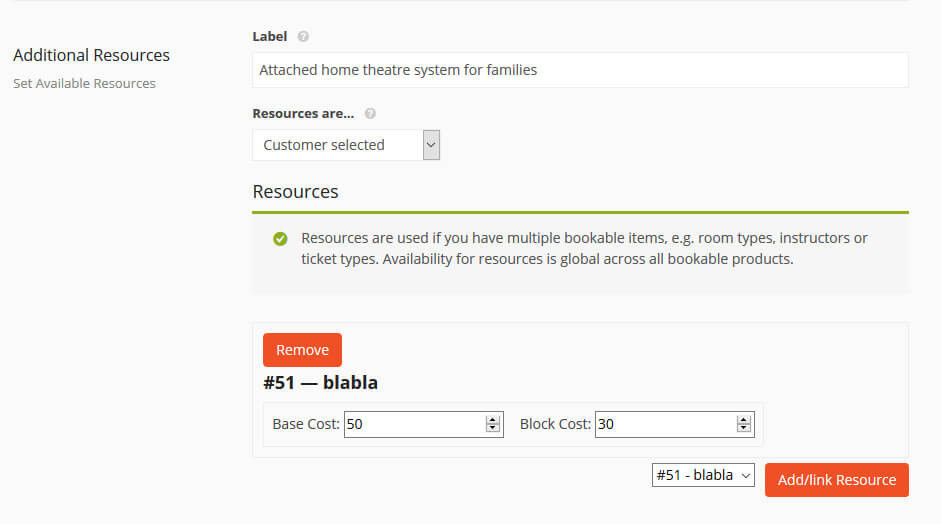
What is Has Resources?
Enhancing Your Product with Additional Resources:
Should you wish to amplify your product’s offerings, here’s your opportunity. Consider this scenario: in my luxury suite, I’ve incorporated a resource that provides guests the option to set up a home theater system for their movie-viewing pleasure.
These resources come with a versatile twist – you can either automate their allocation or let customers handpick them. Furthermore, you have the option to charge for resources both as initiation costs and for the duration they’re utilized.
Here’s how to proceed:
1. Enter the associated resource cost.
2. Choose the desired resource from the dropdown menu.
It’s noteworthy that resources can also come with their own ranges, influenced by distinct attributes. For more details on this aspect, you can access the dedicated menu.
By introducing resources, you’re adding an extra layer of customization to your product.
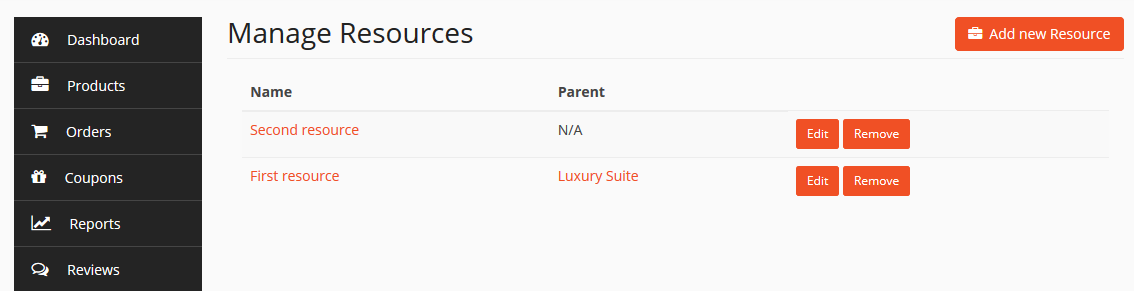
Creating a resource
To manage your resources effectively, follow these steps:
1. Access the Vendor Dashboard.
2. Navigate to “Bookings.”
3. Click on “Manage Resources.”
Here’s where you can control your resources. If you’re looking to add a new resource, simply click “Add New Resource.” For adjustments to existing resources, you can utilize the “Edit” or “Remove” options to modify their properties.
This ensures you have complete control over the resources associated with your product.
Customer Frontend Usage
Once you’ve chosen a product or service available for booking through Slickmall, the next steps are as follows:
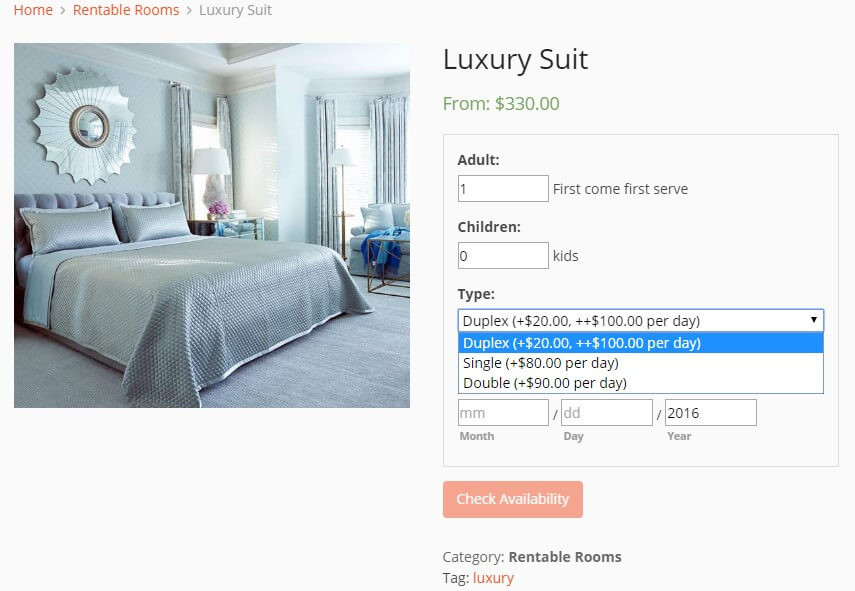
When your customers reach the booking stage, they’ll encounter the options you’ve previously established while creating the product or service. Here’s what they’ll do:
They’ll have the flexibility to select the number of individuals within the range you’ve defined, ensuring a minimum and maximum count. Additionally, they’ll be able to choose from the types of resources you’ve crafted, tailoring their booking to their preferences.
This ensures a personalized experience that matches your customers’ needs.
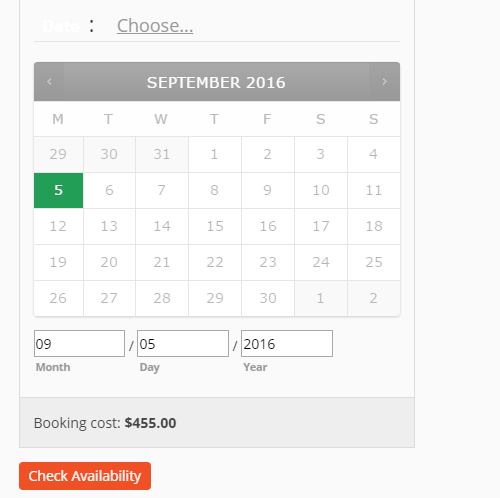
Once your customers have chosen the desired number of individuals and any required resources, the next step is to pick the date for their booking. Here’s how:
By clicking on the “Choose” button, they can access the calendar to view available dates. From there, they can easily select the date that best suits their preferences.
This ensures a smooth and convenient booking process tailored to their needs.
Ordering
Once a suitable date is identified and available, the “Check Availability” button will become active. By clicking this button, customers will be directed to the order page.
This seamless process ensures that once they’ve found an available date, they can swiftly proceed to finalize their booking.
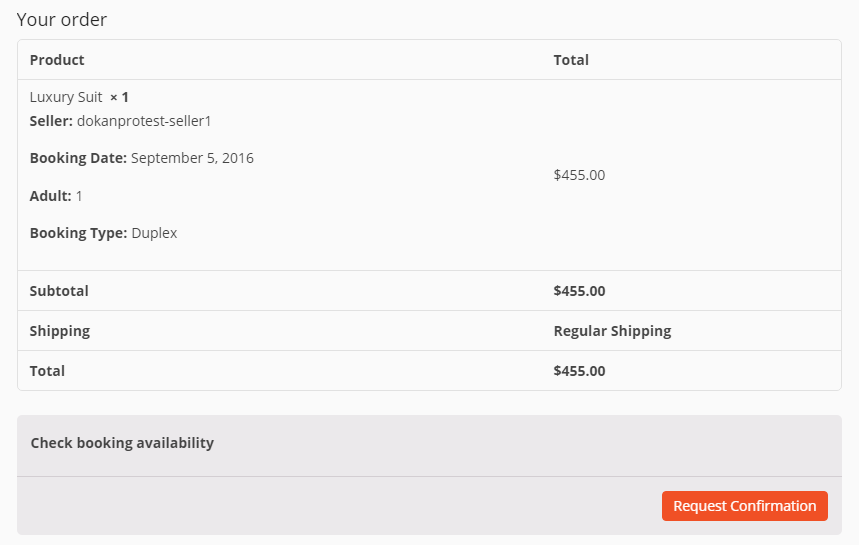
At this stage, your customer will need to furnish the essential details required for placing the order of the chosen product or service. Once they’ve filled out the order form, the next step is to click the “Request Confirmation” button. This action will initiate the creation of a new order.
This user-friendly process ensures that once they’ve entered the necessary information, they can seamlessly proceed to formalize their order.
Creating Bookings on Behalf of Customers
Vendors have the capability to generate bookings directly from the front end for their customers.
To initiate this process, follow these simple steps:
1. Access the Vendor Dashboard.
2. Navigate to the “Booking” option.
3. Click on the “Add New Booking” button.
This user-friendly feature empowers vendors to conveniently create bookings on behalf of their customers, enhancing the overall experience.
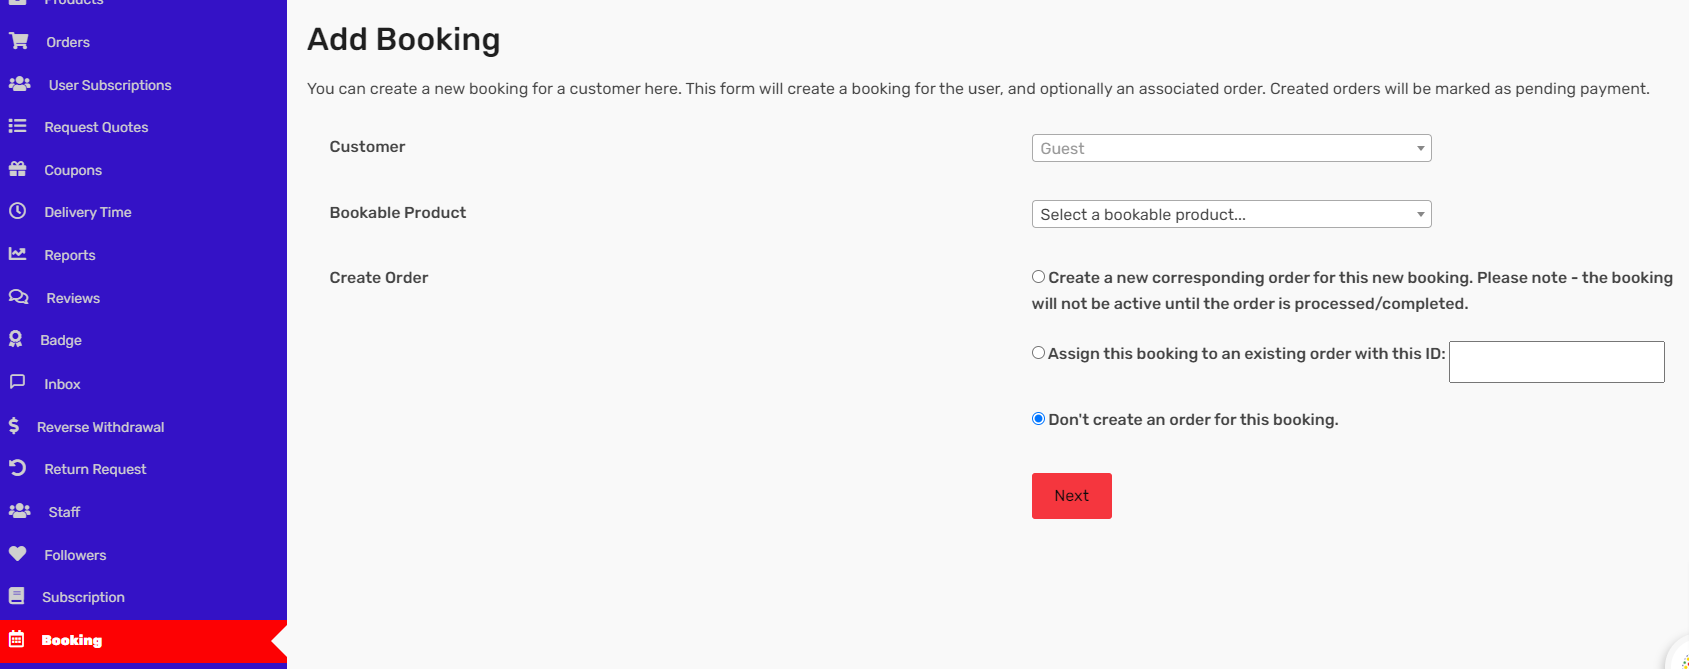
Vendors have the convenience of searching for a new customer by entering their name or opting for the “Guest” option. Afterward, the vendor selects the desired bookable product from the dropdown box. It’s important to note that vendors will find their specific bookable products in this dropdown, while administrators have access to all bookable products.
Now, let’s explore the available booking options:
1. New: Opt for this option to create a fresh order. Vendors will need to process and complete this order before it becomes active.
2. Addition: Select this to add an order to an existing booking. You’ll need to input the relevant ID for this booking.
3. No Order: This choice creates a booking without an associated order.
This streamlined process ensures that vendors can effectively manage customer bookings.
The next step involves vendors choosing the desired date and time using the booking calendar. Once this is done, simply click on “Add Booking” to finalize the process. Afterward, vendors will be directed to the “Manage Bookings” section, where they can verify the successful creation of the booking.
This intuitive process ensures that vendors can efficiently set up bookings according to date and time preferences.
Accommodation Booking
Empower yourself to offer hotel rooms, homes, apartments, and various spaces for rental and leasing with our accommodation booking feature.
To begin creating an accommodation booking product, follow these steps:
1. While in the process of creating a bookable product, opt for the “Accommodation” option.
This user-friendly functionality allows you to diversify your offerings and cater to customers seeking temporary accommodations.

Upon selecting the accommodation product, a set of new fields will come into view.
This enables you to delve into the specifics of creating and customizing accommodation offerings.
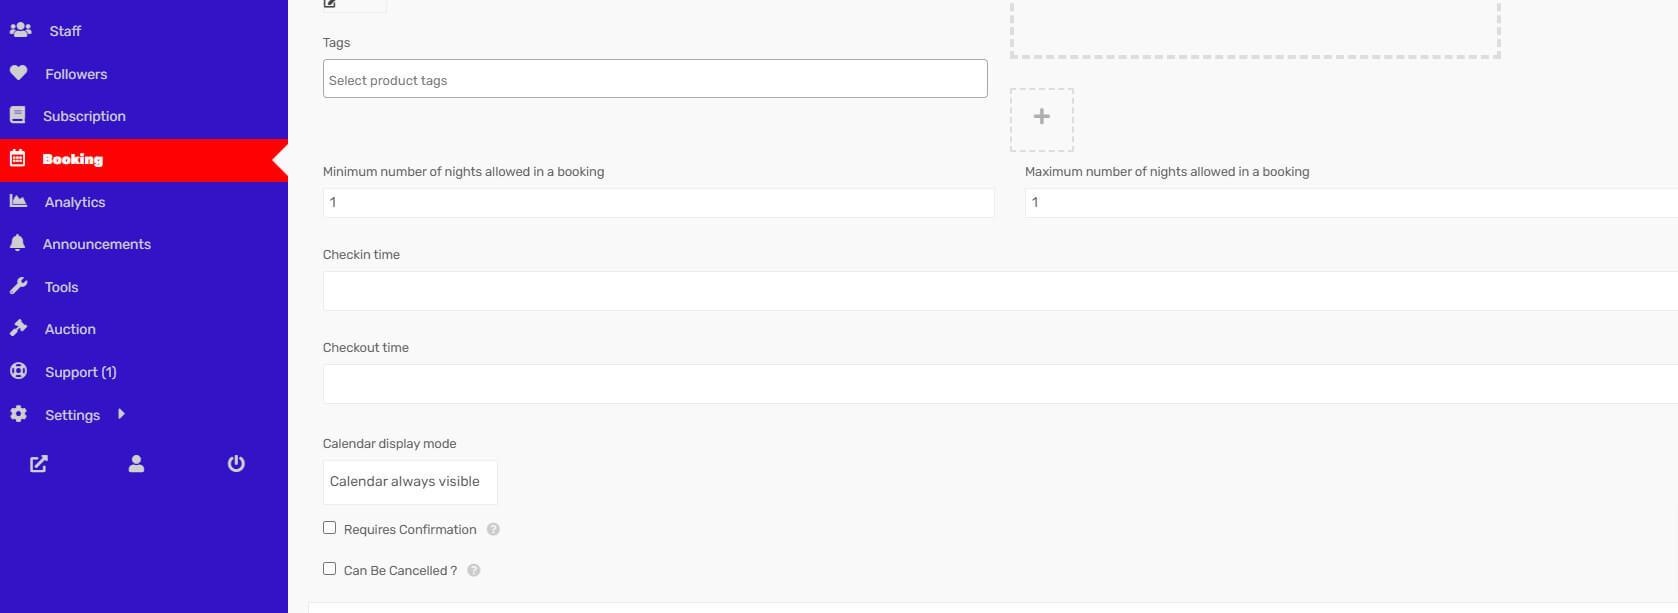
As you navigate through the accommodation product configuration, you’ll come across a series of options to personalize the experience:
-Minimum Number of Nights: Determine the minimum nights customers must select for a booking.
-Maximum Number of Nights: Set the upper limit for the number of nights customers can book.
-Check-In Time: Specify the preferred check-in time.
-Check-Out Time: Define the check-out time.
-Calendar Display Mode: Choose whether the calendar is always visible or appears upon clicking.
– Requires Confirmation: Indicate if the booking necessitates your confirmation.
-Cancellation Flexibility: Enable customer-initiated cancellations within a specified period.
-Booking Cancellation Parameters: Configure further details once “Can be Cancelled” is selected.
These settings allow you to tailor the accommodation experience to your preferences.
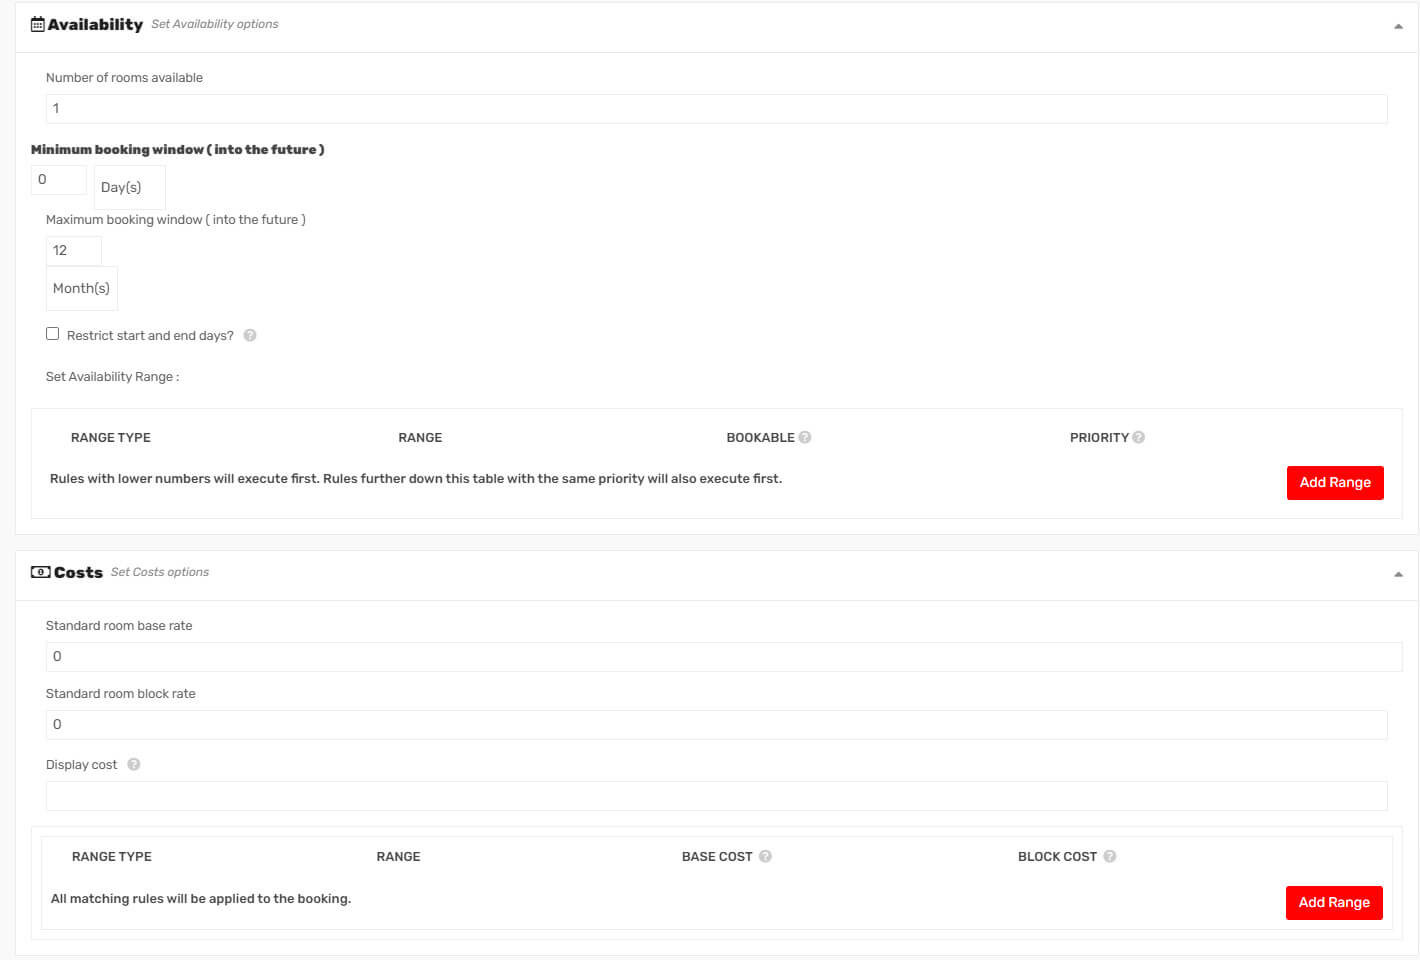
As you refine your accommodation product, consider the following settings to tailor the experience:
-Number of Available Rooms: Specify the quantity of rooms open for booking.
-Minimum/Maximum Booking Window (into the future): Imagine today is March 1 and you set the minimum block bookable to 1 month into the future. In this scenario, the earliest available booking date for customers would be April 1. The same principle applies to the maximum booking window.
-Restrict Start and End Days: For instance, if you offer weekly rentals and want customers to start only on Fridays, Saturdays, or Sundays, you can set this restriction. Keep in mind, other days remain available for selection; they just can’t be chosen as starting days.
-Defining Availability Range: You can establish specific availability criteria, including:
– Months
– Days of the week
– Time slots
– Specific dates
-Standard Room Base Rate: This applies regardless of a customer’s selections on the booking form.
-Standard Room Block Rate: This represents the cost per block, as assigned in the General tab. If a customer books multiple blocks, this cost multiplies by the number of blocks chosen.
-Display Cost: This value is shown to users on the front end. If left blank, it’s calculated automatically.
These options empower you to shape your accommodation offering according to your preferences.
Welcome to the cutting-edge capabilities of Slickmall’s Vendor Subscription Product module, where vendors can take their offerings to the next level by creating subscription products for their valued customers. This revolutionary feature paves the way for a diverse range of possibilities, enabling vendors to introduce subscription-based services such as courses, services, and SaaS products. Let’s delve into the exciting details:
Slickmall’s Vendor Subscription Product module empowers vendors with the tools they need to seamlessly offer subscription-based products. Whether you’re an educator offering online courses, a service provider delivering ongoing value, or a SaaS company catering to software needs, this module revolutionizes how you engage with your customers.
Imagine the potential of offering subscription-based courses. With Slickmall, you can provide learners with ongoing access to educational content, allowing them to continuously expand their knowledge and skills. This subscription model fosters lasting relationships with your students, resulting in enhanced engagement and growth.
Subscription services are the future of customer-centric offerings. Whether you’re a consultant, trainer, or coach, Slickmall’s Vendor Subscription Product module enables you to deliver consistent value to your clients. Establish long-term partnerships by offering subscriptions that cater to their unique needs, ensuring they receive the guidance and expertise they require.
Slickmall opens doors for SaaS companies to reach their customers in an innovative way. By offering subscription-based software solutions, you’re not just providing a product – you’re delivering an ongoing experience. This model fosters customer loyalty and ensures continuous engagement, resulting in mutual growth.
The Vendor Subscription Product module offers an avenue for vendors to reimagine their business models and provide sustained value to their customers. It’s a win-win situation that creates lasting relationships and drives business success.
Whether you’re a vendor ready to embrace the subscription model or a customer seeking valuable, ongoing services, Slickmall’s Vendor Subscription Product module has you covered. Our support team is here to assist you every step of the way, ensuring a seamless transition to this exciting offering.
So, embark on this journey of transformation with Slickmall’s Vendor Subscription Product module. Explore the possibilities, connect with your audience, and witness the evolution of your business.
Creating A Product
Embarking on the journey to create a subscription product is both exciting and simple. Here’s how you can get started:
First things first, you’ll need to create a product. It’s the foundation upon which your subscription offering will be built. To initiate this process, follow these easy steps:
Head over to the Vendor Dashboard, your control center for all things related to your offerings. From here, you can seamlessly manage and curate your products to meet your customers’ needs.
Begin by selecting the “Add New Product” button. Upload an image of the product, provide a name, select a category, add descriptions, and then press the “Create Product” button. Once your product is successfully created, proceed to click on the “Edit” option located beneath the product’s name.
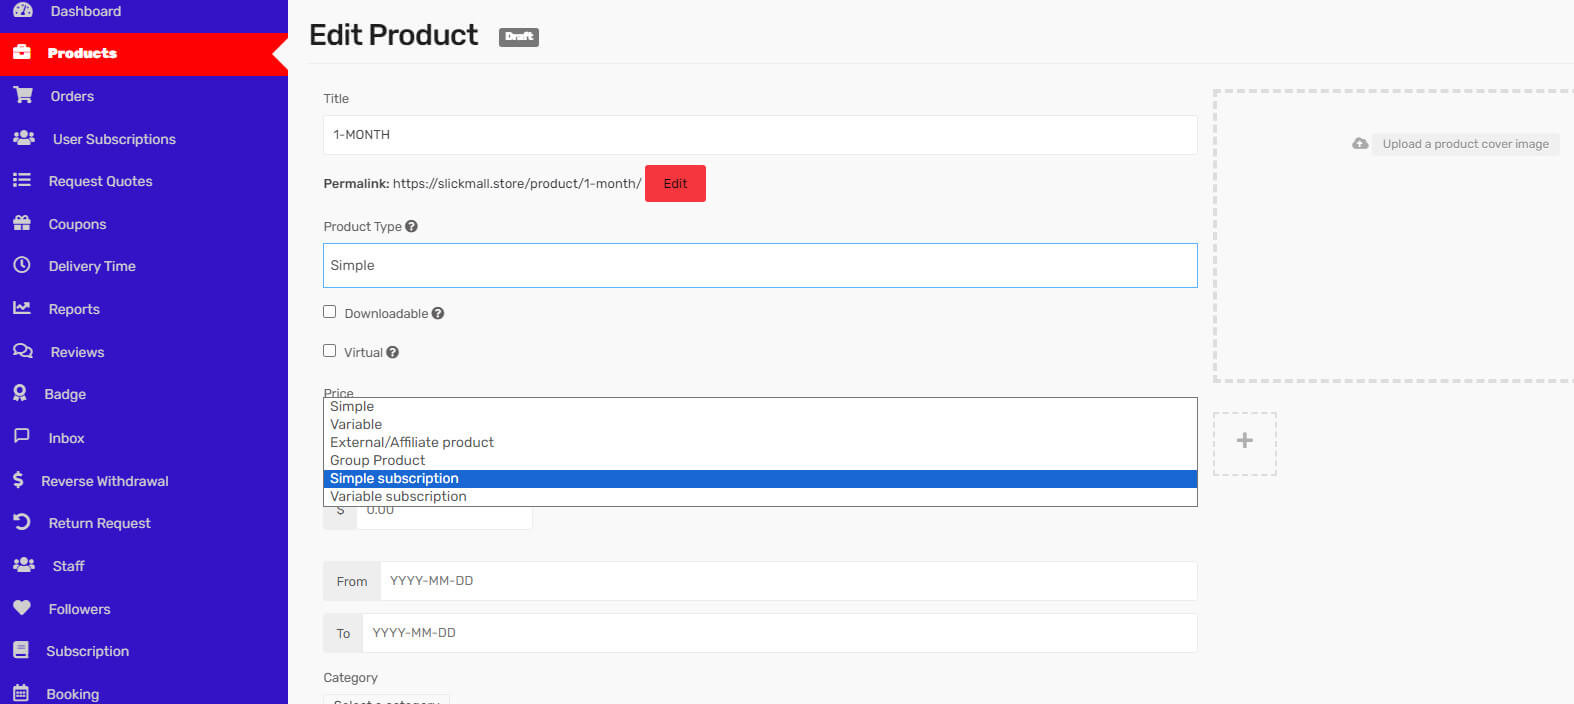
You can set two types of subscriptions. Let’s start with Simple Subscription.
Simple Subscription
1.Choose Your Subscription Type: From the dropdown menu, pick the “Simple Subscription” product type.
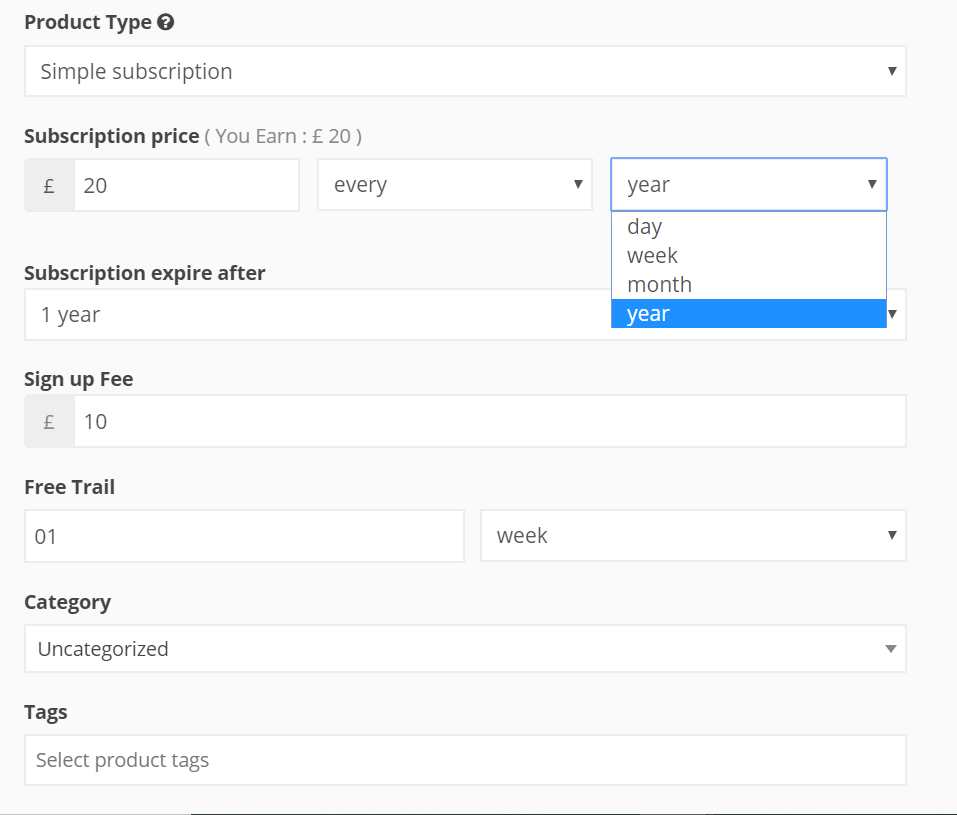
2.Customize Your Subscription: Now comes the fun part – tailoring your subscription exactly the way you want it.
-Subscription Price: Subscriptions are all about flexibility, so you can choose from daily, weekly, monthly, and yearly renewal periods. Want payments every two weeks? Just set the price for every 2nd week. Looking for quarterly billing? Simply set the price for every 3rd month.
-Subscription Expiry Date: You have the power to set the end date for your subscription plan. But remember, if you set “Never expire,” the subscription can keep renewing indefinitely as long as payments are successful.
-Example Scenario: Let’s say you’re offering a one-year newspaper subscription at $4 per month. With a 10-month duration and a one-month billing cycle, it would look like this:
-Subscription price: $4 every month
-Expires after: 10 months
3.Sign Up Fee: There’s a sign-up fee to consider, which is in addition to your recurring subscription amount. Imagine you’re offering a subscription for $70 per month with a $100 sign-up fee. When someone signs up, their initial total at checkout will be $170.
-Special Note: If your subscription includes both a sign-up fee and a free trial, only the sign-up fee will be charged at the beginning. And if there’s no free trial but a sign-up fee, the price charged is… you guessed it – the sign-up fee.
sign-up fee + recurring first month’s total.
Free Trial: Think of it as a bonus time added to your subscription’s length. Here’s a friendly example to help you understand: Imagine you’re offering a subscription at $5 per month for a total of 6 months. Now, if you sweeten the deal with a 1-month free trial, guess what? The subscription will keep delighting your users for a total of 7 months! Isn’t that fantastic?
Once you’ve filled in all the fields with your awesome details, just give that “Save Product” button a little tap. And guess what? Your brand-new creation will pop right up for you to admire! Enjoy the view!
Variable Subscription
Think of the Variable Subscription as a sibling to the Variable Product. But, there’s a twist – to dive into this subscription, you’ll want to craft some variations. These variations can be based on different locations, which adds a cool touch. Imagine having unique subscriptions tailored for the Ghana and Malaysia!

Now, you need to add Attributes. Click on the Add Attribute button.

Don’t forget to define the Attribute name and spice it up with some value options using the “|” symbol. And when you’re ready, give that “Save Attribute” button a satisfying tap.
Oh, and a quick tip: make sure to check the box that says “Used for variations.”

Yet, within distinct product attributes, every variation within a Variable Subscription has the potential for its own special:
– Sign-up fee
– Trial period
– Recurring price
– Billing period
– Subscription length
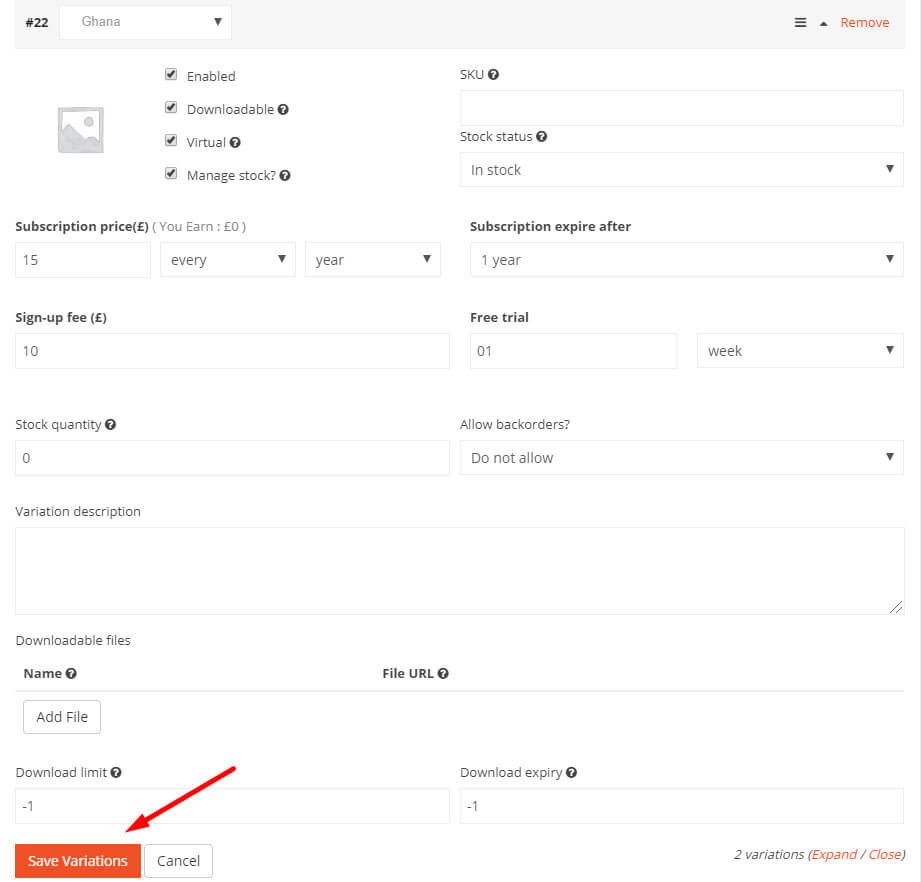
To wrap things up, simply click the “Save Variations” button.
For the next step, navigate to the dashboard sidebar and select the “User Subscriptions” button. This is where you can catch a glimpse of all the subscriptions that have been snatched up! 🎉👀
Subscription Coupons
Give the left sidebar a click, and select “Coupons”.
When used on a subscription product, it trims down both the sign-up fee and the recurring cost, but solely for the initial payment. Here’s a scenario: Let’s say there’s a subscription product priced at $25 per month, with a $50 sign-up fee. Ordinarily, it would be $75 upfront, followed by $25 each month. But, if a coupon worth $10 is applied to this subscription, the subscriber would only pay $65 upfront, and then continue with $25 per month.
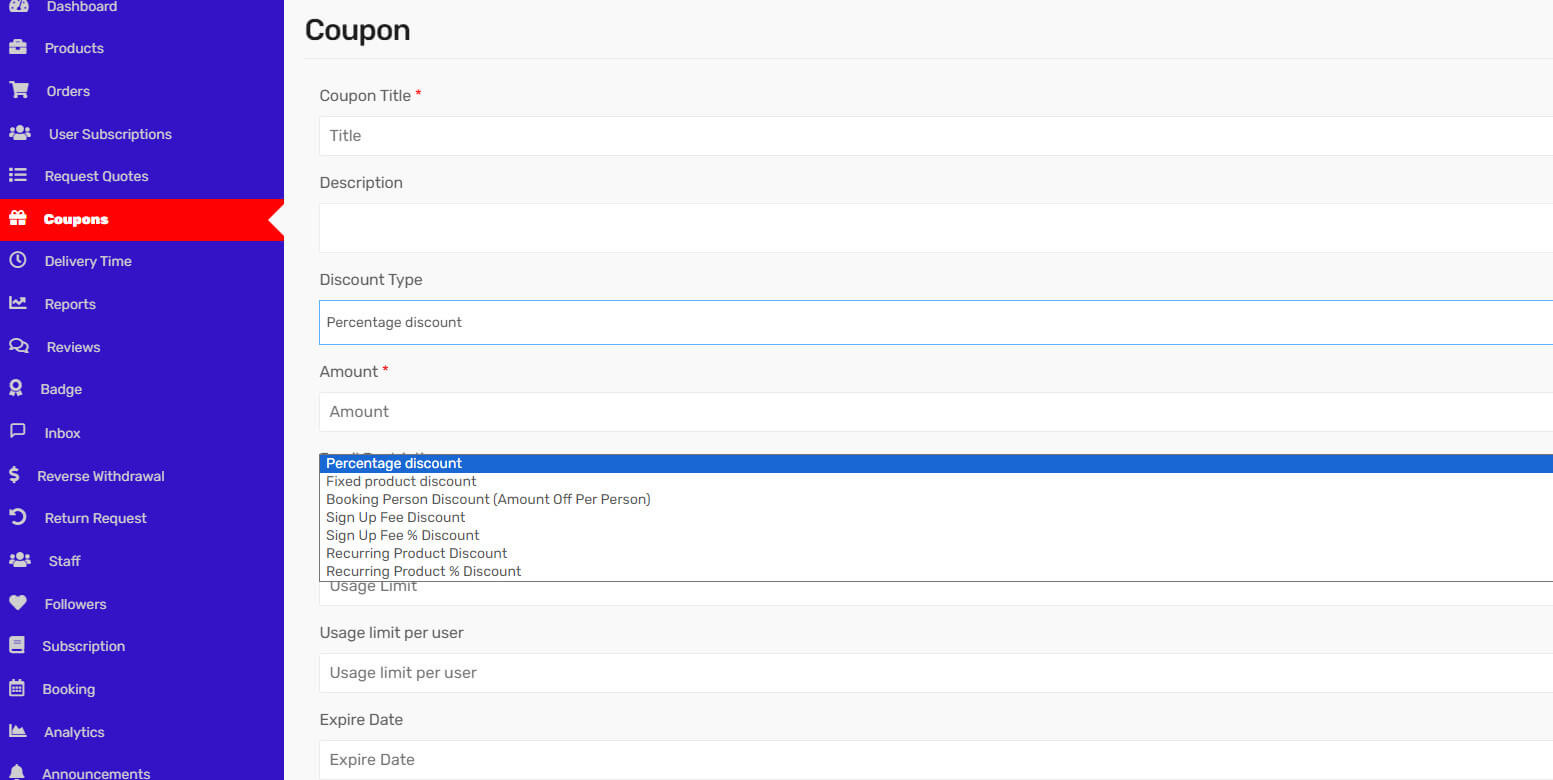
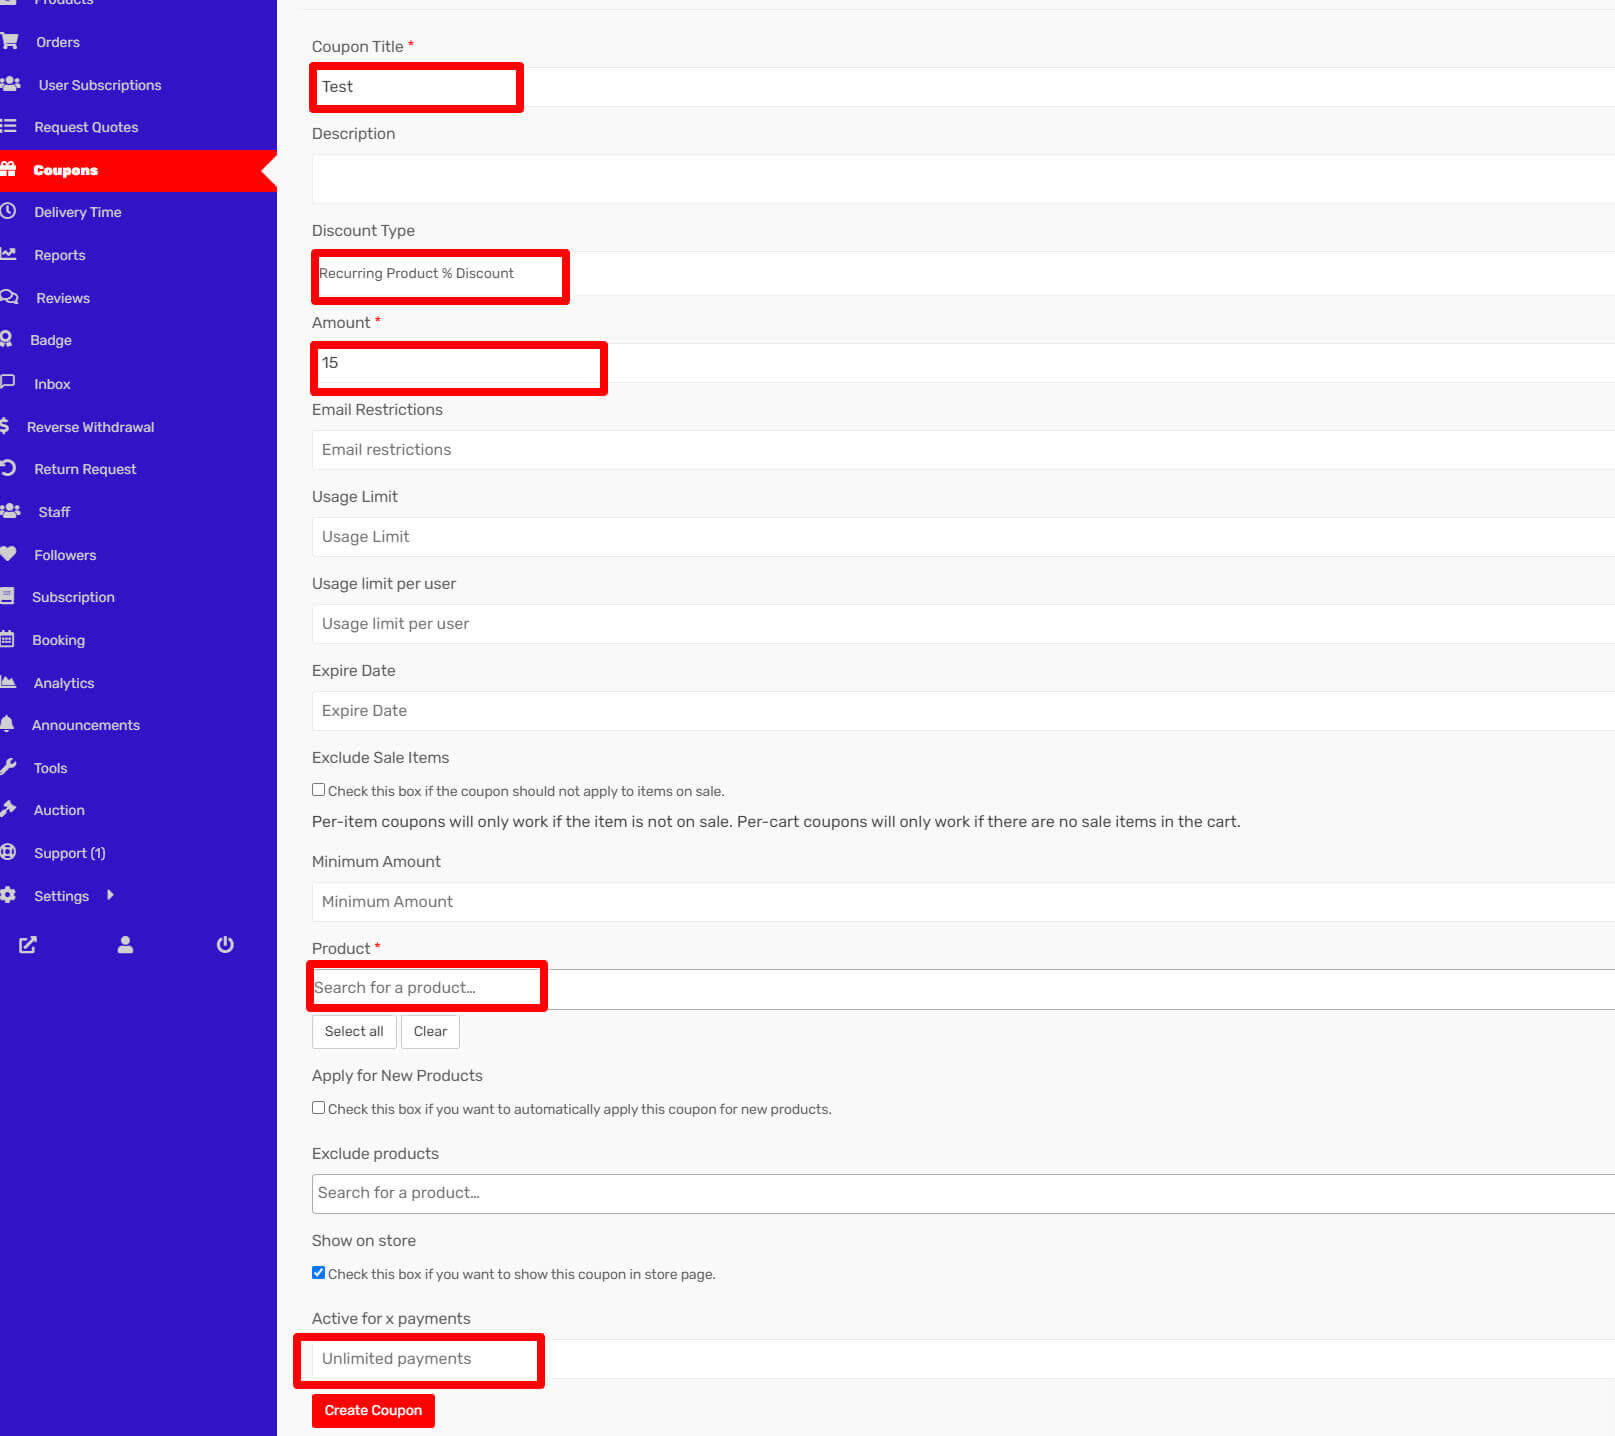
Opt for “Recurring Product Discount” as the Coupon Title and select “Recurring Product % Discount” as your Discount Type. By doing so, you’ll notice an additional field appear: “Active for x Payments.”
Populate this field with a number to ensure the coupon is valid for that specific count of payments, which includes the first one. Once the coupon has been used for the designated number of payments, it will be smoothly taken off from the subscription automatically.
Advertising/Subcription Packs
Purchasing Advertising
Enhance your visibility and reach with our advertising options for vendors within the marketplace! As a vendor, you now have the exciting opportunity to purchase advertisements directly from our platform.
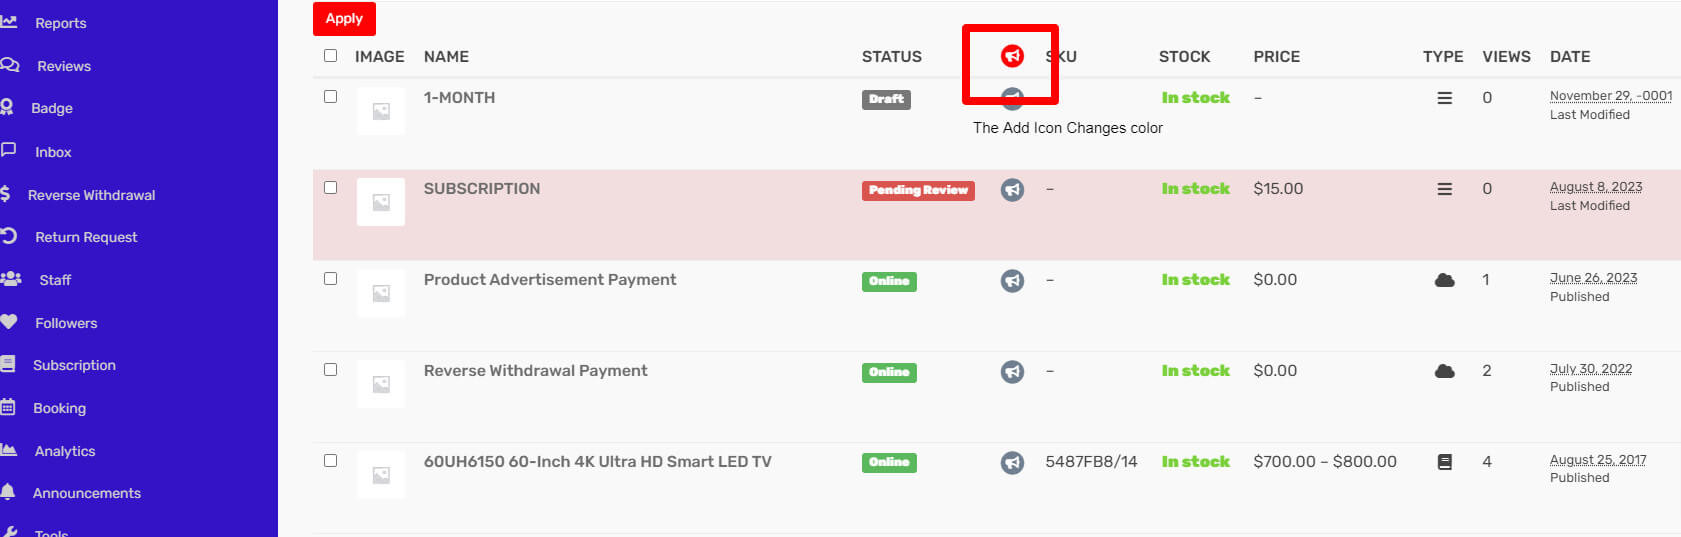
Navigate to the Vendor Dashboard and head over to the “Products” section. You’ll notice a dedicated advertising area thoughtfully designed to boost your products’ exposure.
Our user-friendly interface makes it simple to explore advertising possibilities, giving you the chance to showcase your offerings to a wider audience. Don’t miss out on this chance to stand out and make a lasting impression.
Elevate your business today by leveraging our advertising features – it’s your gateway to greater success in the marketplace!
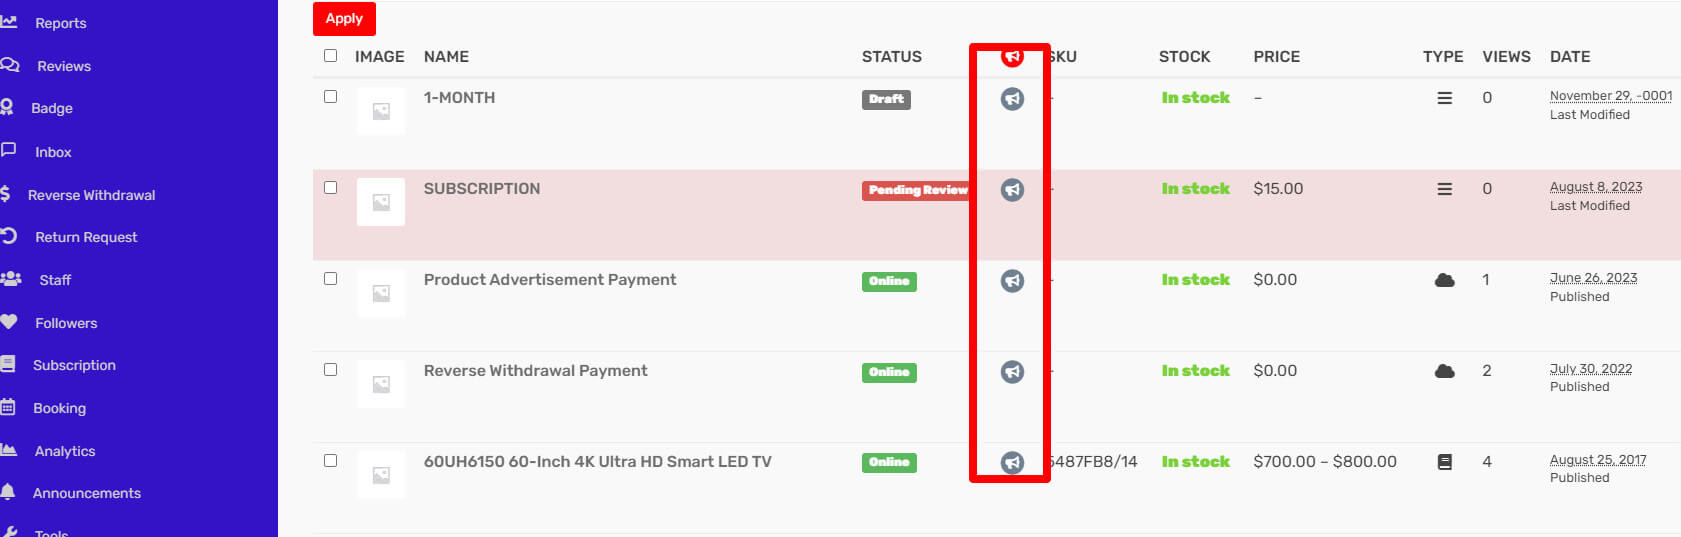
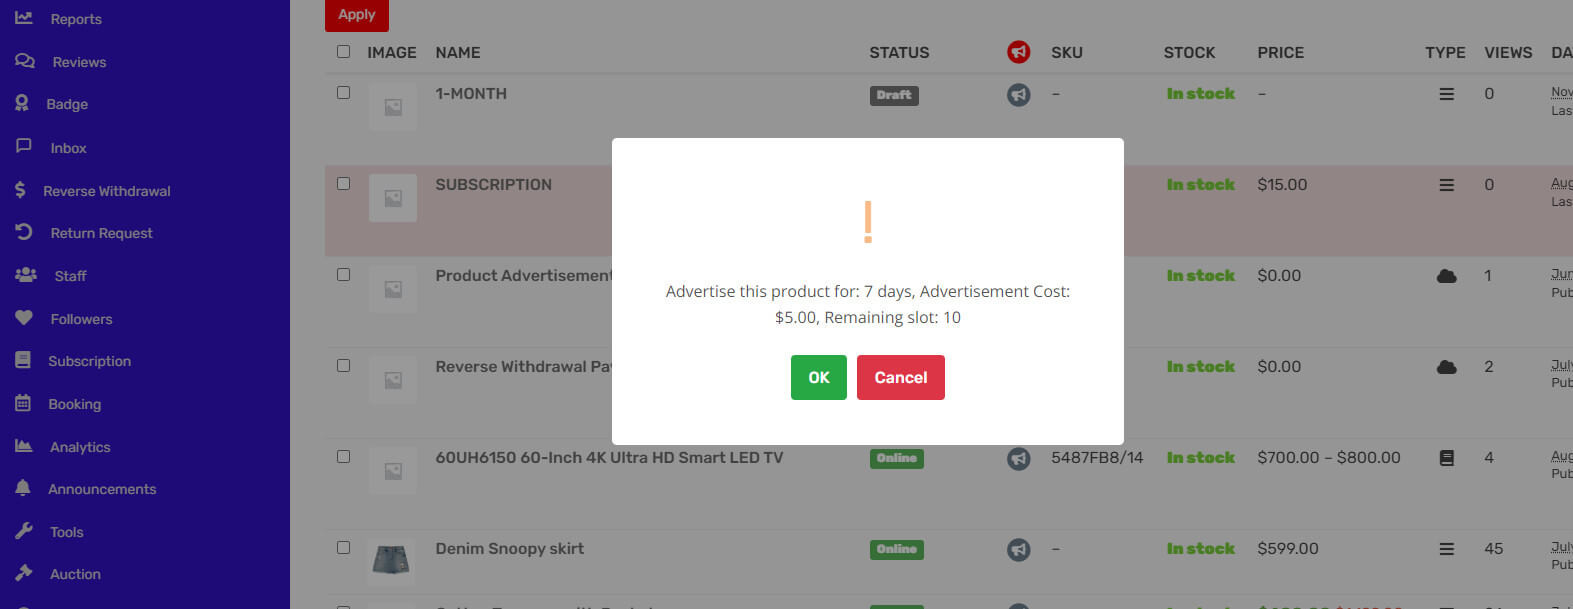
When you’re in the Vendor Dashboard, simply locate the advertising logo attached to your chosen product. Give it a friendly click, and voilà – a pop-up window appears, presenting you with all the exciting details you need.
Inside the pop-up, you’ll find essential information like the purchase fee, the number of available slots for advertisement, and the expiry date for this fantastic opportunity. It’s your chance to make a well-informed decision that aligns perfectly with your marketing goals.
When you’re ready to take the plunge, go ahead and click on the inviting “OK” button. By doing so, you’re not only purchasing an advertisement slot; you’re also taking a step towards increasing your product’s visibility and driving more engagement.
Once you’ve clicked that “OK” button, you’re on your way to amplifying your product’s reach through our advertisement feature.
The “OK” will smoothly add the chosen advertisement to your cart and directly to the checkout page.
For your convenience, we’ve handpicked a variety of payment gateways to choose from. Whether it’s credit card, digital wallet, or any other preferred method, you’re in control.
The moment you complete the transaction, your advertisement is seamlessly incorporated into your chosen product.
Subscription Packs Buying.
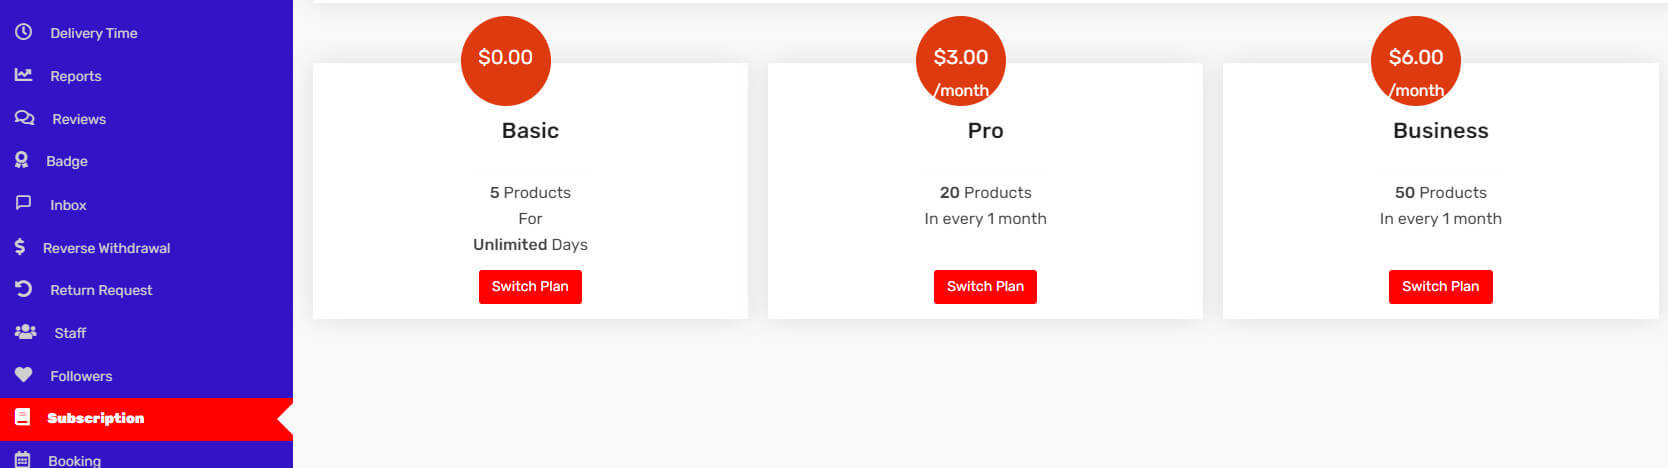
To explore the range of subscription packages and make a purchase, vendors can navigate to the Vendor Dashboard, followed by selecting the “Subscription” section.
NB: Kindly take note that vendors are advised to refrain from purchasing a subscription pack simultaneously with any other products from the marketplace. This is due to constraints within the payment gateway. We kindly request vendors to complete their subscription pack purchase as a standalone transaction. Any additional shopping can be comfortably done in a separate cart at your convenience.
Your understanding and cooperation are greatly appreciated.